Thứ Năm, 21 tháng 7, 2011

WELCOME TO THE WORLD OF COMPUTER

We are living in the world of technology. Everyday we see new inventions and progress in the field of technology. There are many ways to get knowledge of computer e.g library, classroom, etc. Now a days we also see many website about computer information. I am also trying to convey knowledge of computer through this blog. Hope that you will like it. 
Thanks. (A.G)

 INTRODUCTION TO COMPUTERS.
Today, you can find computers almost everywhere. Microwave Ovens, automobiles, thermostats and even wristwatches contains computer chips. In fact, computers are so common in modern society that everyone is affected by computer technology to some extent.
A computer is an electronic device that processess data and converts it into information.

HISTORY OF COMPUTERS.
The history of computer starts about 2000 years ago with the birth of the abacus. it is shown in pic. wires with beads strung on them. when these beads are moved around, according to programming rules memorized by the user, all regular artihmetic problems can be done.

CLASSIFICATION OF COMPUTER
Computers come in many different sizes and ranges of power, and different types of computer systems have varying capabilities. Today's computer systems are classified into following categories:

Mainframe computer
    Mainframe computers are used in large organizations like insurance companies and banks where many peopole need frequent access to the same data, which is usually organized into one or more huge database. Airlines use large mainframe systems for flight scheduling, reserving, ticketing and meeting a range of customer service needs. These computers are basically used in networked environment, as a single user can not utilize their full processing power.  Best example of mainframe computers is IBM S/390.

Supercomputer
    super computers are the most powerful computers and physically they are some of the largest. These systems are built to process huge amount of data and the fastest supercomputers. such as Cray T90 system, can house thousands of processors.
Super computer can cost tens of millions of the dollars and consume enough electricity to power dozens of home.  Super computers are rare used only by large corporations, universities and high level agencies that can affort them because their these computers are most costly.

Minicomputers
    Because of their small size these computers are called Minicomputers..These computers have high processing powre than microcomputers and also have less processing power than mainfram computers. these computers are less expensive than mainframe computers nad are ideals for organizations that could not afford mainframe. The HP 3000 is an example of minicomputers.

Microcomputers.
    Microcomputer are also called personal computers.  these are developed particularly for individual users. computer computers are less powerful as compared to minicomputers. Microcomputers have very low price so these machines are very popular. PCs are getting powerful day by day because of the development in technology. Microcomputers are available in markit in different style and models, i.e desktop, laptop and pocket computer etc.

COMPUTER COMPONENTS.
A computer is a device that accepts data nad processes  it for some result based on a sequence of instructions. The sequence of instructins given to computer for manipulating data is known as a program.
There are two basic components of a computer system.
    Computer Hardware
    Computer Software

Computer Hardware.
    The physical parts of computers system that you can touch and feel are known as computer hardware. Computer can be divided into following hardware units. 
  1. Input Unit
  2. Out put Unit
  3. System Unit

INPUT UNIT.
    Input unit of a computer system consists of input devices. Due to the diverse nature of the data, variety of input devices exist to input data in different forms for example. keyboard is is used to enter textual data, mouse is used as a pointing device nad to trigger different commands, microphone is used to enter voice and scanner is used to enter image etc. Input unit of a computer may contain all or some of the above mentioned devices and even can have many other.

OUTPUT UNIT
Output unit of a computer system consists of output devices. As data presented to user can take variety of forms, therefore different output devices are needed e.g. monitor is used to display image and text on a screen, similarly printer is used to get output on paper and speaker are used to receive voice etc.

SYSTEM UNIT
    System unit contains a number of components which are enclosed in casing. The casing have two different shapes i.e Tower casing and desktop casing. The most important component of the system is a circuit board called Mother board. All other components are attached with mother board. It is made up of silicon. Other parts of the system unit are hard disk, ram, floppy drive, microprocessor, vga card, sound cards, network card etc.
 

CPU (Central Processing Unit)
It is called microprocessor. Also it is called brain of computer. Many type of microprocessors are available in market. Pentium I, P II, P III, P IV, Duel Core, Core to Due, and now the latest technology is Core I 3, I 5, I 7 have launched. Processor's speed is measured in Mega Hartz. (MHZ)

Hard Disk.
Operating system directly installed in disk called Hard drive. It stores information faster than any other drive. Installation or Information stored in a hard drive is measured in unit called bytes. The upgrade values of bytes are as follows.
1000 bytes   =  1 kb (kilobyte)
1000 kb       =  1 Mb (megabytes)
1000 mb      =  1 Gb (gigabytes)
1000 gb       =  1 Tb. (Terabytes)


FLOPPY DRIVE.
It is also called a: drive. a floppy can store 1.4mb of information. Floppy is no longer popular among people because of low capacity. 


CD ROM 
Cd rom drive is used for CD (Compact disk). A cd has more space than a floppy disk.  A simple cd rom is used to read the cd. Cd writer is used to write data on cd. 


DVD ROM/WRITER
A dvd  (Digital versatile disk) has much more space than a cd. quality of a dvd is also much better than any cd. dvd writer is used to record text data or movies on a dvd disk.


RAM. (Rendam access Memory)
Ram is also called extended memory. it increases the bus speed of computer.


POWER SUPPLY. 
Power supply is found in every system. it receive 220 v Ac and convert it into multiple dc volts.  Man port of power supply  provide DC current to mother board. It is connected to Mother board. similarly many other ports are found in power supply. these ports are used to provide current Hard drive, Cd rom, Floppy drive etc.  Yellow cable of power supply emits 12V DC and red cable emits 6 V DC. Power supply which was used in P.I or 486 computers is called AT supply and supply used in P2, P3, P4, I3, I7 etc is called ATX supply. ATX  supply runs through motherboard.


Thứ Sáu, 15 tháng 7, 2011

Hacking TP-Link WR1043ND Part 4

To Tweak the OpenWRT for Pure Performance there is no other way than editing config files from Terminal so I hope you actually read Part 3 before.
There are 4 parts to Tweaking the Performance
  1. Wireless Performance
  2. Wired Performance
  3. Web Performance
  4. QoS (Quality Of Service)
Tweaking Wireless Performance:

Setting to Wireless N with G backward compatibility

The TP-Link WR1043ND Hardware has a 3 Transmit 3 Receive Radio that is only Single Band with 20/40MHZ  Frequency. It has Wireless B/G/N Capability.
To fully understand WiFi Standards you need to read up on IEEE 802.11 standards.
We start by tweaking the Radio.

Wireless N allows backward compatibility with B and G, you need to set it to 802.11g+n.
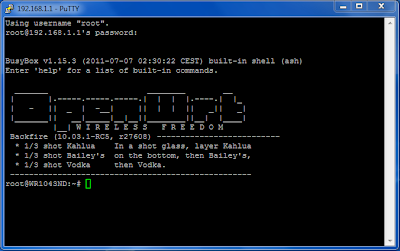
You can do this by logging into the Router via Putty using vi editor edit the file called "wireless" in /etc/config/, or do it in LuCI Web Interface(Router Config Page).


Adjusting Channel Width:

Next you need to make sure the Router is using 40MHZ Channel Width, this will allow greater throughput.
You can do this by logging into the Router via Putty using vi editor edit the file called "wireless" in /etc/config/
config 'wifi-device' 'radio0'
        option 'type' 'mac80211'
        option 'channel' '7'
        option 'macaddr' 'XX:XX:XX:XX:XX:XX'
        option 'hwmode' '11ng' #Wireless G and N Modes
        option 'htmode' 'HT40-' # Set to 2.4GHZ 40MHZ Fat Lower(-) Channel
        option 'noscan' '1' # Enable neighbour 'unfriendly' WiFi Settings
        option 'country' 'US'
        list 'ht_capab' 'SHORT-GI-40'
        list 'ht_capab' 'DSSS_CCK-40'
        option 'disabled' '0'
        option 'txpower' '24'
config 'wifi-iface'
option 'device' 'radio0'
option 'network' 'lan'
option 'mode' 'ap'
option 'ssid' 'Your_SSID_Here'
option 'encryption' 'psk2'
option 'key' 'your_secret_key_here'

Note that there are 2 htmodes, HT40+ and HT40- you set them based on the channel available. If you set it wrongly you have to log in to the router via Ethernet Cable and change it back.
By rights 'htmode' is not allowed if there are competing BSSID using that channel (the good neighbor regulation), but you can override that with 'noscan' option. There is also a distance optimization setting which I tested the best values at 20-25.

Below is a graph displaying the difference between 40MHZ Channel Width and 20MHZ Channel Width.
Note that you can define more than 1 Access Point on OpenWRT. You can configure a Second AP as Guest and Fire-walling it from your own LAN.


Higher TXPower (Transmit Power)

Transmit Power allows you to resize the cell. Max Value is 24 only works with US regulatory settings.
You can also try placing the Wireless Router at a higher position for better signal strength.

Tweaking Wired Performance:

Next you need to make sure the Router Ethernet Performance is adjusted by changing the sysctl variable this will allow greater throughput.
You can do this by logging into the Router via Putty using vi editor edit the file called "sysctl.conf" in /etc/

kernel.panic=3
# The following 3 lines helps to ensure Router will always have
# sufficient memory and will not crash during samba file copy
vm.vfs_cache_pressure=1000
vm.min_free_kbytes=4099
vm.swappiness=0

net.ipv4.conf.default.arp_ignore=1
net.ipv4.conf.all.arp_ignore=1
net.ipv4.ip_forward=1
net.ipv4.icmp_echo_ignore_broadcasts=0
net.ipv4.icmp_ignore_bogus_error_responses=1
net.ipv4.tcp_ecn=0
net.ipv4.tcp_fin_timeout=30
net.ipv4.tcp_keepalive_time=120
net.ipv4.tcp_syncookies=1
net.ipv4.tcp_timestamps=1
net.core.netdev_max_backlog=5000
net.netfilter.nf_conntrack_checksum=0
net.netfilter.nf_conntrack_max=32768
net.netfilter.nf_conntrack_tcp_timeout_established=3600
net.netfilter.nf_conntrack_udp_timeout=60
net.netfilter.nf_conntrack_udp_timeout_stream=180
# Use ipv6
net.ipv6.conf.all.forwarding=1


# disable bridge firewalling by default
#net.bridge.bridge-nf-call-arptables=0
#net.bridge.bridge-nf-call-ip6tables=0
#net.bridge.bridge-nf-call-iptables=0
# Increase TCP max buffer size setable using setsockopt()
# 2 MB might be enough for some very long end-to-end paths
net.core.rmem_max = 2097152
net.core.wmem_max = 2097152
# Increase Linux autotuning TCP buffer limits
# min, default, and max number of bytes to use
# (only change the 3rd value, and make it 2 MB or more)
net.ipv4.tcp_rmem = 4096 87380 2097152
net.ipv4.tcp_wmem = 4096 65536 2097152
 
# The following 2 lines enable ipv6 privacy mode
net.ipv6.conf.all.use_tempaddr=2
net.ipv6.conf.default.use_tempaddr=2
All the TCP tweaks are derived from ESnet
Note: These tweaks are not found on OpenWRT How Tos, however I soon discovered that someone is working on bufferbloat hence the tweaks on buffersize should be approached with caution.


Also if you have a Windows File Share you want to tell the Router firewall not to monitor SAMBA Packets.
Windows Share also known as SAMBA in Linux uses the Port 445 so you need to tell OpenWRT to stop monitoring Packet Originating from LAN using Port 445.


Tweaking Web Performance:
Web Peformance typically require a lot of DNS Look up so you want to tell OpenWRT to use the Fastest DNS Server available.
You can do this by logging into the Router via Putty using vi editor edit the file called "dnsmasq.conf" in /etc/ or do it in the file /etc/config/dhcp
and add the fastest DNS Server closest to you.
Add the Line Below and change the IP of the server to YOUR fastest DNS Server. My Fastest DNS Servers may not be your Fastest DNS Server.
dhcp-option=6,165.21.83.88,8.8.8.8,208.67.222.222
Blue is a Singapore ISP DNS Server, Green is Google DNS Server, Red is OpenDNS Server.
There is no limit of the number of DNS Server you can set on OpenWRT

Quality of Service                    

What is Quality of Service?
Quality of Service makes it so that during torrenting, your webpages doesn't take a long time to load even though you are on a 1Mbps Connection.
It does this by prioritizing network traffic, putting webpage network packets in higher importance than torrent packets.
The step to installing QoS is logging into the Router via Putty then
opkg install luci-app-qos
You set the QoS by setting the Port the Network Originate from and the Priority. Or you can set layer 7 filter to detect torrent traffic. Note that Layer 7 filtering is processor intensive activity and might cause the routing performance of the router to drop.


Hopefully you learn a lot from this series of blog post and enjoy the high performance of your Modified Router running on OpenSource Software.
If you run a Windows Share Server when you place the laptop beside the router and do a copy you should be getting insane WiFi Speeds @ 150Mbps at 5m line of sight
Let the numbers speak for themselves!


In case you modified the wrong config files and got lock out the fail safe mode is here.

If you are interested I have a OpenWRT built for TL-WR1043ND that I use personally myself. It is optimized to my satisfaction for pure performance.
You can get it here.

Hacking TP-Link WR1043ND Part 3

I will only be posting HOW-TO not found in OpenWRT Pages, if you need to config a particular setting please refer to the Well-Documented OpenWRT HOW-TOs here.
Useful Wiki on OpenWRT include
  • Getting 3G Modem working
  • VPN (not complete)
  • Files and Settings
  • NFS Network FileSharing
It is troublesome/pointless to rewrite well-documented resources.
Reading the How-To is a must have for all OpenWRT newbies!

First you need to set a Router Config Page Login Password.
Otherwise the SSH ports will not be open for you to configure and upload files to it.
Open Web Browser, Enter "192.168.1.1" in URL Bar.
Then follow the picture below:


From here onward is to demostrate how to login and use the Router like a Linux Terminal Computer.
It makes little sense not to leverage on the Compute Capabilities of Linux after using a more powerful third party firmware.
OpenWRT assumes users know Linux Terminal KungFu hence it is intimidating to those who don't.
Hopefully after reading this you will pick up some Terminal KungFu.
_______________________________________________
Upload Files to Router using SCP


______________________________
SSH (Login) into Router


Basic Linux Commands in OpenWRT
  • "ls" - List Files in Existing Folder
  • "dmesg" - Display System(Router) diagnostic message 
  • "pwd" - Display Present Working Directory
  • "opkg" - OpenWRT Package Installer 
    • "opkg install package" to install a software call "package"
    • "opkg remove package" to uninstall a software call "package"
    • "opkg list-install" to list all installed software"
    • "opkg update" to update list of package available in the OpenWRT Repository the router needs to be connected to the internet before you can update
    • "opkg" to display all possible commands
  • "wifi" to restart Wireless Radio
  • "ifup/down" to start or stop a Particular Interface
    • "ifup wan" to start WAN interface
    • "ifdown wan" to stop WAN interface
    • "ifup lan" to start LAN interface
    • "ifdown lan" to stop LAN interface
  • "cd" to change directory
    • "cd .." to go up 1 level (Exit the folder)
    • "cd /" to go to Root Directory 
    • "cd /tmp/ to go to tmp directory (If you want to go to a specific directory type "cd /tm" then press Tab to auto complete the name of the folder useful if the name of the folder is very very long
  • "vi" Text Editor
    • eg. to Edit a file call "network" in folder "/etc/config/" type "vi /etc/config/network"
    • The default mode in VI is view mode to display text files
    • To enter/delete Text in vi press "i" to Enter insert mode and type to enter backspace to delete
    • To delete a particular line of text in vi Press "Esc" go to the line using arrow then enter "dd" twice and the line disappears
    • To save a file press "Esc" then ":w" (w stands for write)
    • To exit VI press "Esc" then ":q" (q stands for quit)
    • To exit without saving  press "Esc" then ":q!" (! stands for "I don't care just do it !)
    • To exit with saving  press "Esc" then ":wq"
  • "reboot" to restart Router
  • "cp" - copy eg to copy a file called "network" from inside /tmp/ to /etc/config"      
"cp /tmp/network /etc/config/network"
    • Syntax as follows: cp <source> <destination>
  • "rm" - Delete a particular file
  • "wget" -Download file from Internet (Must be connected to Internet first, make sure the file size doesn't exceed the the total memory of the router)

The list of commands is actually quite a chunk, you should read up on Linux Shell if you are interested.

Hacking TP-Link WR1043ND Part 2

Part 2: Upgrading to OpenWRT


First of all what is OpenWRT?

It is a niche Linux Distribution meant for Routers.
Which means after installing it you can add packages onto the Operating System to expand its capabilities.
Much like any Linux Distribution it maintains a package repository for end-users.

It will help alot if you have prior knowledge on Linux Terminal Commands because OpenWRT run Linux.

Why OpenWRT out of so many Third Party Firmware?

OpenWRT provides its own Repository brimming with numerous packages.
It is very much like Debian is for Routers.

Hardware Required:
  1. Working Ethernet Cable to connect the PC to the Router                                                                                (You should have 1 in the Box where you bought the Router).
Software Required:
The Software Required is for controlling the Router Via a PC otherwise you can't interact with it.
  1. SSH Terminal (For Windows Download Putty, Most GNU\Linux should have SSH Terminals by Default)           This Program is for Accessing the router like logging in to a server.
  2. WinSCP (For Windows Download WinSCP, Most GNU\Linux should have SCP Terminals by Default)      This Program is for Uploading and Downloading Packages to the Router.
  3. Fairly Advance Web Browser ( Either Firefox, Internet Explorer and Chrome will do)                                       This is for accessing the LuCI Web Interface installed into the router.
a)Download the Firmware from OpenWRT Download Site.

For TP-Link WR1043ND we access the OpenWRT Stable Repository.
Go to the Folder for the latest release of OpenWRT then go into the /ar71xx/ subfolder.
This folder is meant for Atheros MIPS Processor based routers.
Scroll until you find files with the name "openwrt-ar71xx-tl-wr1043nd-v1-"

Look carefully and you should see 2 matching files:
The first ends with
openwrt-ar71xx-tl-wr1043nd-v1-squashfs-sysupgrade.bin
The second one ends with
openwrt-ar71xx-tl-wr1043nd-v1-squashfs-factory.bin
Sysupgrade is for Upgrading Routers already installed with OpenWRT of the older versions while factory is for Upgrading Routers on Original Firmware.

Assuming the Router is runnning Original Stock Firmware from TP-Link, download
openwrt-ar71xx-tl-wr1043nd-v1-squashfs-factory.bin 

b)Flashing the Firmware
  1. Disconnect all Internet Connections on the PC and Router. 
  2. Ensure the Router/PC is on Stable Power Source.
  3. Connect the PC use to upload the file to the Router using the Ethernet Cable.
  4. Open Internet Browser on the PC
  5. Type "192.168.1.1" in the URL Bar of the Internet Browser to access the TP-Link Router Configuration Page if you did not touch any ip configuration the default is usually 192.168.1.1.
  6. Default Login name and Password is written under the Router.
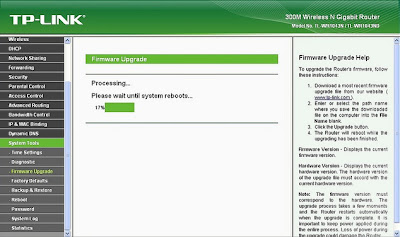
  7. Go to the Firmware Upgrade Utility Page
  1. Click on Browse then navigate to the Folder where you downloaded  openwrt-ar71xx-tl-wr1043nd v1-squashfs-factory.bin
  2. Click Upgrade and Wait for 15 mins 

    1. Double Check the Lights on the Router it should blink quickly then turn off then turn on again.
    2. Type "192.168.1.1" in the URL Bar of the Internet Browser again. You should see the LuCI Webpage
     
    1. There should be no password just click login. Set a password (Under Administration) immediately to enable SSH Login.
    2. You are done your router is now running on OpenWRT, but you are not done yet you still need to configure the router for normal use.

    Hacking TP-Link WR1043ND Part 1

    This is a series of blog post detailing about how to hack the TP-Link WR1043ND to maximize its potential.
    I will try to be as noob friendly as possible.
    My Mods are in no way original, it is just a collection of existing mods combined into a few articles for easy instructional reading.
    Special Thanks to the guys @ OpenWRT who made this possible.

    The hacks done are as follows:
    1. Upgrade the Internal DDR RAM from 32MB to 64MB.
    2. Upgrading the firmware from TP-Link Stock Firmware to OpenWRT.
    3. Accessing/Operating OpenWRT from Shell Commands
    4. Configuring and Tweaking the Router for Maximium Performance. Please Read 3 first.
    First of all why mod a router?
    • To make it do more for less because a router is actually an embedded system which can do more running Open Firmware rather than suffer the limitations imposed by stock firmware. After installing OpenWRT you will be able to install packages to make the router perform more tasks than ever.
    • To get better performance. Most manufacturers do not actually tweak the router performance much, rather they prefer to prettify the routers so they can sell more instead of making it do better at what it is supposed to do because most consumers are stupid.
    • Get latest updates. When running stock firmware, updates are pretty much at the mercy of manufacturers, compared to running open firmware like OpenWRT you get new updates every time there is a new release.
    • Learn more. You get to learn more about Linux and other stuff you never knew before and that itself is priceless.
    Why you do not want to mod a router:
    • Firstly it voids warranty, it is possible that during the course of modding you may damage the router if you made a mistake hence it doesn't make sense for the manufacturer to pay for your mistake.
    • It is tedious and costly if you do not have the tools or the patience or brains.
    The Router


    The Router in question is the TP-Link WR1043ND.
    Why TP-Link WR1043ND out of so many OpenWRT supported routers?
    1. It is cheap. If you check the market for routers you will find it selling for a low cost. I bought it for SGD$75. Do the conversion and you will be convinced.
    2. It is powerful. Again if you check the market you will find the next cheapest Gigabit Router priced at more than SGD$100. In the WR1043ND you will find lots of flash memory for installing OpenWRT as well. The 3 Antennas it possess further increase the Wireless Performance. It also contain a USB Port for expanded possibilities (FileSharing anybody?).
    3. It is Stable. Because of reason 1) and 2) many hardware hackers have bought and modified this router and OpenWRT to suit it, so it runs incredibly stable on OpenWRT.
    TP-Link is a Network Device Manufacturer from China but being objective, I am not concern about branding. I don't get anything useful out of branding, rather I am more concern with the performance I can get for a low cost. Moreover it is a excellent product specification wise.

    Information about the MIPS24KC Core SKU


    The Specification:

    The Core
    CPU = Atheros AR9132-BC1E rev 2
    MIPS Architecture Rev = MIPS 24Kc V7.4
    ASEs implemented = mips16
    (code-compression support only)
    CPU Speed = 400MHz
    Advance High Performance Bus (AHB) = 200MHZ
    Instruction cache = 64kB, VIPT, 4-way, linesize 32 bytes
    Data cache = 32kB, 4-way, VIPT, cache aliases, linesize 32 bytes
    Flash Type = Serial
    Flash Chip = 25P64V6P 99AJAV5 MYS722
    Flash Size = 8MB
    RAM Size = 32MB
    RAM Bus = 400MHZ
    RAM Chip = Zentel A3S56D40FTP
    Switch = Realtek RTL8366RG A1G17A2 GA05B
    Ethernet Port Count = Gigabit LAN and WAN Ports
    Power = 12V/1.5A
    USB = 1 USB 2.0 Port

    The Radio
    Wireless Radio = Atheros AR9103 3x3 MIMO
    Channel Width = 20MHZ or 40MHZ
    Antenna Connector Type = 3dBi Detachable RP-SMA Omni Directional Antenna X 3
    Wireless Standard = IEEE 802.11b/g/n
    WiFi Operating Frequency = 2.4~2.4835GHz (Single Band)
    802.11n = up to 300Mbps
    802.11g = 6, 9, 12, 18, 24, 36, 48, 54Mbps
    802.11b = 1, 2, 5.5, 11Mbps
    Part 1: Upgrading the DDR RAM

    Upgrading the DDR RAM requires soldering, if you are not good at this you can skip this section.
     
    Tools required:
    1. Soldering Iron
    2. Solder (Try to get good quality ones poor quality ones have very little flux hence difficult to solder)
    3. Soldering Flux
    4. Way to Desolder SMT Component ( I used ChipQuik, simple fast, easy, and clean )
    5. Desoldering Wick
    6. Dexterous Hands
    7. Magnifying Lens
    8. Tweezer 
    9. Isopropyl Alcohol for Cleaning also known as Rubbing Alcohol in Pharmacies
    10. Compatible DDR RAM IC (TSOP 66, 66 pins and 16bit Data Width, Check the DataSheet to be sure)
    List Of Known Compatible RAM IC:
    Hynix HY5DU121622DTP-D43
    Infineon HYB25D512160B
    a) Dissembling The Router
    1. Turn off the Power and Unplug all cables. This is common sense.
    2. Unscrew the Antennas, this is to prevent obstruction of soldering activity later.
    3. Ground yourself, depending on where you are, electrostatic charges can accumulated on your body and its discharge may damage sensitive electrical equipment.
    4. Remove the 2 Rubber Feet at the back of the router. The exposed screws are circled in Red.
    5. Pull the lid up from the back so the router lid is angled as shown below.
    6. Using a Flat Head Screw Driver, slide the tip into the slit exposed in front and give it a gentle twist and the cover should come off. Do it for both sides.                                                                                                           
    7. You should see the exposed board as shown. The DRAM to be desoldered is shown below boxed in Red                                                                                                                                                        
    b)SMT Desoldering the DRAM
    1. Ensure the tip of the Soldering Iron is clean, otherwise you will have a hard time soldering.
    2. Spread some soldering flux along on the legs of the DRAM using a tweezer.
    3. Next, I melt the ChipQuik on the legs of the IC using the soldering Iron. ChipQuik is a low temperature solder which means it remains in liquid state at warm temperatures therefore it is easy to remove it.
    4. Make sure ChipQuik fuses with the legs of the RAM. Do not apply heat directly to ChipQuik or the legs or the DRAM or the Board using the soldering Iron. The trick is to touch the ChipQuik, melt it, spread it on the legs and remove the soldering Iron. This is to lessen the likelyhood of damaging the DRAM by excessive heating. Do this quickly repeatedly until the ChipQuik fuses with the legs of the DRAM. Do this for BOTH sides of the legs on the DRAM.
    5. When the ChipQuik fuses with all the legs of the DRAM, gently but firmly nudge the DRAM to dislodge it from the solder pads using a tweezer while ChipQuik is still fluid. If it doesn't budge repeat 3) and try again until it dislodges. Remove the DRAM.
    6. After it dislodges use a desoldering wick dip with some flux and put it on the remaining ChipQuik left on the board. You do not have to use desoldering wick on big pieces of ChipQuik you can pluck it off the green board when it cools.
    7. Heat the soldering wick with the soldering Iron and it should absorb the ChipQuik like a sponge with water.
    8. Clean the Soldering Pad using the method in 7.
    9. At the end you should be left with a 66 clean soldering pads ready accept a new IC.
    10. If you are still not sure what to do after reading this watch some youtube videos on SMT Soldering it will give you a better picture on SMT Soldering.
    c) Soldering on the new DRAM
    1. You should have the DRAM IC upgrade ready as shown. 
    2. Apply some Flux on the Soldering Pad.
    3. Align the Pins of the New DRAM with the Soldering Pads. Notice there is a Black Circle on the DRAM. You need to match the Orientation of the DRAM with the Router Circuit Board diagram printed on the board.
    4. Make sure the legs are aligned on BOTH Side of the soldering pads. Apply Flux on the DRAM legs.
    5. Dip the tip of the Soldering Iron with some solder and spread it on the legs.
    6. Gently spread the solder on the legs using the Soldering Iron. Touch the solder, gently drag along the legs and release, repeat until all the legs are covered. If solder is stucked between 2 or more legs, apply more flux on the stucked solder and repeat Step 6 again.
    7. Make sure the solder do not short the legs of the DRAM.
    8. Examine the Legs using a Magnifying Lens to make sure no shorting occurs. Make sure every leg of the DRAM gets some solder. If you have too much solder remove the excess out using the soldering wick.
    9. Clean the Router Board and the DRAM using clean cloth dipped in Isopropyl Alcohol (Rubbing Alcohol) 
    10. Again If you are still not sure what to do after reading this watch some youtube videos on SMT Soldering it will give you a better picture on SMT Soldering.
    Let the Router Board Dry (Alcohol evaporate quickly) turn on the power. Your Router should boot up just fine.
    Unlike BroadCom MIPS routers most Atheros MIPS router do not need modification of the NVRAM to fully initialize the Memory.

    Note that different Routers contain different memory. TSOP 66 is used by DDR Memory and has 66 Pins.
    The other common memory found is TSOP 54 which has 54 pins but TSOP 54 has low Storage Density hence it is unlikely to find a compatible DRAM to upgrade to.

    Extra Tips: If you feel your router is overheating this is a solution:

    Thứ Ba, 12 tháng 7, 2011

    Genius' Two Tower SP-HF2020 Speaker System Available in the USA and Canada

    Digital 4-Way Hi-Fi Speakers SP-HF2020


    Taipei, Taiwan – Genius, a leading manufacturer of computer peripherals, has released their new 2-piece 60 watt (RMS) SP-HF2020 speaker system. Now available in the USA and Canada, this speaker system comes with two towers as well as a remote control. Each tower has one high-quality 1” tweeter for treble sound, one 3” close frame speaker for accurate mid-range sound, and two 3” open frame speakers that deliver beautiful and rich sounding bass.

    These speakers are perfect for enjoying TV, movies, games, and music, and come equipped with a professional-grade D2Audio digital sound processor (DSP) with three equalizer effects: EQ-WideSound to mimic large room/amphitheater sound quality, EQ-DeepBass for heightening and increasing bass level sounds, and EQ-AudioAlign to optimize sound output to a specific location within a room for maximum enjoyment. With excellent sound quality, chic piano black front- and side-panels, Genius' SP-HF2020 2-tower speaker system is sure to be a hit with North American consumers.

    At the bottom of one of the towers on the front-panel, buttons are located to control volume, equalizers, and input source (digital or analog). The six-key remote control includes all of these functions and adds mute and stand-by buttons as well. The back-panel of the tower is home to 2 RCA jacks (right and left audio stereo jacks) for easy connection to gaming consoles, DVD players, and TVs.

    Additionally, a standard 3.5mm input port is located there as well for connecting to computers, MP3 devices, and CD players. Furthermore, a coaxial input has been placed alongside the other inputs, adding digital sound input compatibility.

    With its ability to connect to a wide array of devices, its stylish design, rich and resonant sound output capabilities, in addition to all the excellent features, Genius' SP-HF2020 speaker system is a great choice and now available in the USA and Canada.

    Package Contents:

    Two speaker towers
    One RCA to 3.5mm stereo cable
    One remote control
    One multi-language user’s manual


    Product information and photos are available at: http://www.geniusnet.com/wSite/ct?xItem=48211&ctNode=148

    About Genius
    Genius is an international leading brand in computer peripherals. Established by KYE Systems Corp. in 1983, Genius offers PC products including computer mice, keyboards, web and security cameras, speakers, gaming peripherals, remote controls, headphones, digital cameras, digital camcorders and digital photo frames. Genius also expanded from computer peripherals into consumer electronic products that include mobile phone accessories, Bluetooth headsets and iPod speakers. Since 2007, Genius has been one of Taiwan’s top 20 Global Brands. For more information you can visit the Genius website at www.geniusnet.com.