Some OEMS embed the VGA BIOS in the EFI/BIOS in your laptops,
other OEMs have a separate VGA BIOS firmware on the VGA Card itself.
TYPE 1
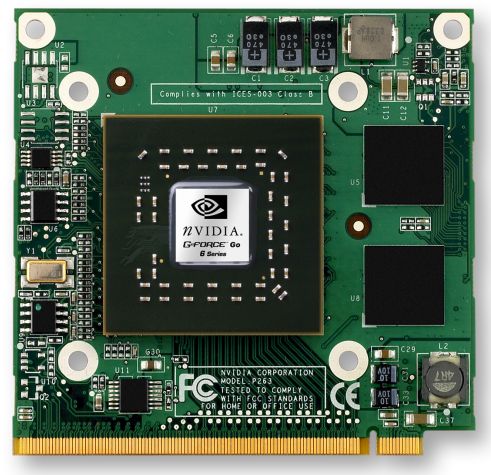
As a general rule laptops with discrete MXM board modules like the (picture below) has
the VGA BIOS as a separate piece of code located on the module itself.
TYPE II
For OEM Boards with a GPU embedded on the Mainboard itself the VGA BIOS usually exist as a chunk of Code inside the BIOS of the Mainboard itself.
(Picture below shows the GPU on the top left corner on the mainboard covered by the black plastic)

Nowadays more and more OEMs are using TYPE II method of integration because
1) They can make the laptop more compact and light because separate MXM modules increase the thickness of the laptop.
2) It is cheaper to integrate everything on the mainboard using BGA soldering rather than have PCI-E connectors.
This article talks about modifying Type II VGA BIOS only.
First you have to identify the Type of Firmware the laptop uses, this is depends on the BIOS Vendor used by the OEM. An OEM can use a different BIOS vendor for different models.
The most prominent BIOS vendors are: Insyde, AMI, Phoenix, AWARD and Intel.
On the website mydigitallife you can find many tools coded by the members for BIOS disassembly.
We are going to use their tools to dissemble the VGA Module from the BIOS.
In this example, the Aspire 4740G uses the Insyde BIOS so download the PhoenixTool which is capable of dissembling Phoenix, Insyde, Dell and other EFI BIOS.
After downloading the PhoenixTool we decompress the PhoenixTool contents to a new folder.

We extract the PhoenixTool to a folder called "NEW". The main program is called PhoenixTool.exe
After decompressing the disssembly Tool we proceed to download the EFI/BIOS from the OEM website and decompress it as well..

From Above we can see the Complete BIOS Firmware is called NALG0x64.fd.
BIOS usually uses file extension such as BIN, ROM, BIO, WPH, FD and many more. Different BIOS Vendor usually use a different identifier.

When we use the PhoenixTool.exe to open the NALG0x64.fd file, the tool also display the emergency Insyde Recovery Filename.

After the modules have been dissembled you should see the screen above. The modules have been dissembled in a newly created folder called "DUMP" where the original NALG0x64.fd is located.

The Red Box shows the VGA BIOS module. The VGA BIOS module is usually a 70-60KB file, to confirm if it is the VGA Module, you open it with a dissembler and check the content, you should see Nvidia text reference in the binary.

The dissembly of the file shows a lot of Nvidia Text Reference to further confirm if it is the exact module you want you should Google the SKU Code in the example above it is "GT218" which references to G310M Nvidia GPU.
Some laptop BIOS has more than 1 VGA BIOS because 1 Model can have many variations of Different Nvidia SKU GPUs.A good example would be the Acer Aspire 4741G.
For ATi you would probably use Radeon BIOS Editor (RBE).
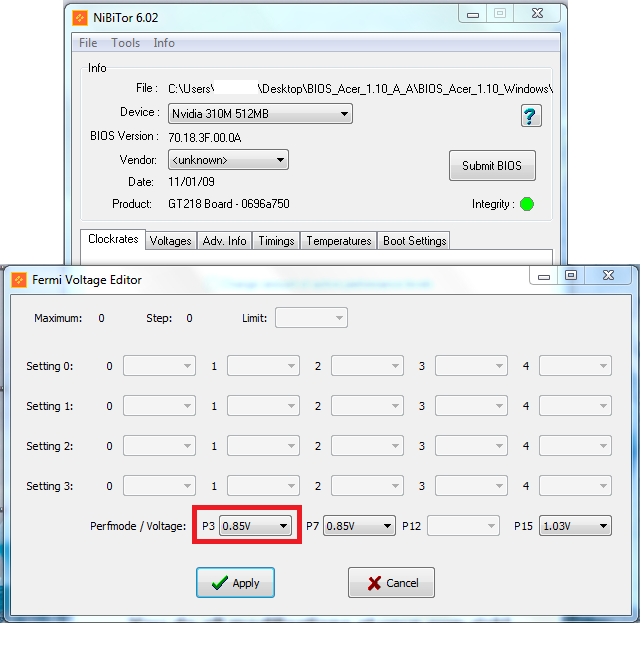
As you can see the original BIOS has the P3 state which is the default state (the lowest performance state) set at a voltage is 0.85V that is why when using HWMonitor you will never see the voltage drop below 0.85.
The lowest performance state can however use a lower voltage of 0.80V.

So we set the P3 State to 0.8V and Apply. Save the Modified VGA BIOS and exit.

Using EzH20, a Insyde BIOS Editor we open the original NALG0x64.fd file.

Select Components -> Replace Module. Each Insyde Module has a Unique GUID identifier.
8 Character - 4 Character - 4 Character - 4 Character - 12 Character
The Module we seek has the identifier "AC1E1B97-69C4-475D-8471-0F3893802F96"

Under "Module to Load" browse to the modified VGA BIOS.

Under "Change ROM GUID" enter the original identifier: "AC1E1B97-69C4-475D-8471-0F3893802F96"
Then Patch the Firmware.

Finally Save the Modified Firmware and flash it with the Insyde flashit Tool while replacing the original NALG0x64.fd with the modified NALG0x64.fd.
Không có nhận xét nào:
Đăng nhận xét