Here are the list of Modified BIOS Collection (mainly SLIC Mods), no warranty provided use at your own discretion!
Acer Aspire 4520G BIOS
Acer Aspire 4530 BIOS
Acer Aspire 4535G BIOS
Acer Aspire 6920G BIOS
Acer Aspire 9920 BIOS
Acer Aspire 6292 BIOS
Acer Aspire 2920Z BIOS
Acer Aspire 5516 BIOS
They are all labeled check the filename before flashing and report if you notice anything wrong.
Crisis Disk in case anything goes wrong (For Phoenix BIOS) Recovery Procedures may differ.
DOS Flashing Package to flash in DOS Mode.
A Good Tool to check for BIOS Information: RW-Everything.
In fact I have a lot of modified BIOS files but I lost track of what models they are for...so thats it!
Thứ Hai, 31 tháng 1, 2011
Chủ Nhật, 23 tháng 1, 2011
DEXGUiDE | Step by step install Adobe AiR & TweetDeck in Ubuntu Variants (LiNUX)
 |
| TweetDeck in 32bit Ubuntu Based Distros |
1. Download Adobe AIR (.deb)
2. Download TweetDeck
3. Place both files on your desktop (for ease of use)
4. Open-up Terminal and type:
- cd desktop
- chmod +x AdobeAIRInstaller.bin
- sudo ./AdobeAIRInstaller.bin
 |
| Adobe Air |
Once Adobe AIR is installed, right click the TweetDeck air file. Select open with and find the Adobe air application installer. If you cannot find it, log out of your session and then login again. The .air file should now be associated with the Adobe Installer.
Follow the guided install and you should now have TD installed on your 32bit unbuntu-based distro.
| TweetDeck |
Chủ Nhật, 16 tháng 1, 2011
DEXGUiDE | From Netbook to a Feature-Rich E-Book Reader
E-book readers are popular for reading digital books, but they've got their limitations. If you have a netbook, you already have a powerful and virtually unrestricted portable e-book reader on your hands. You just need to know how to set it up.

Dedicated e-book readers do have certain things going for them; they're very light weight, have long-lasting batteries, and their digital, e-ink screens are easy-on-the-eyes. A big negative mark against them—in the minds of most geeks at least—is how dreadfully locked down they are. You can't tweak them, modify them, or use them as you see fit. Netbooks, by default of being an unrestricted personal computer capable of running any applications or reading any formats you care to throw at them, suffer from no such shortcoming. The following guide will help you turn your netbook into a comfortable e-book reader that—while it may not be as ultra lightweight and battery-friendly as a Kindle—will be infinitely more flexible.
Rotate The Screen: The tiny widescreen format of the netbook is, in the traditional orientation, terrible for reading e-books. It's squatty and doesn't do a very good job displaying large amounts of text at one time. Holding the netbook sideways in your hands like a book is the ideal way to maximize the screen real estate and read it comfortably.

Depending on your graphics chip and drivers, you may be able to rotate the screen orientation without any additional software by simply pressing CTRL+ALT+Left Arrow or CTRL+ALT+Right Arrow. While it's great to have a built-in solution without installing any additional software, it's a less than ideal solution. The built-in screen-rotation trick works great for desktop computers where you might be rotating a widescreen monitor into a portrait position, but it's not so handy on a netbook or laptop where the orientation of the keyboard and trackpad changes with the orientation of the physical screen.
Fortunately a lightweight solution exists. EeeRotate is a tiny application that combines the rotation of your screen and the rotation of the touchpad at the same time using a single shortcut. Once EeeRotate is installed pressing CTRL+ALT+Right Arrow rotates the screen and touchpad 270 degrees and CTRL+ALT+Up Arrow returns it to normal.
EeeRotate is a must have application for setting up your netbook as an e-book reader and we'd advise downloading it before proceeding.
EeeRotate is a must have application for setting up your netbook as an e-book reader and we'd advise downloading it before proceeding.
Adjust The Screen Brightness: You should decrease the screen brightness to the lowest setting you can comfortably read it at. Not only will you extend your battery life but you'll decrease the strain on your eyes. One of the strong selling points of stand-alone e-book readers is that their digital ink screens aren't back lit and can be read under the same conditions that you would read a regular book.
If your netbook has the ability to turn off the back light altogether you can try it out. Your experience with no back light can vary wildly though. With my Asus netbook I can read it comfortably in direct sunlight just like I would read a Kindle but anything less than full and direct sunshine makes the back-light-off setting completely useless.
If your netbook has the ability to turn off the back light altogether you can try it out. Your experience with no back light can vary wildly though. With my Asus netbook I can read it comfortably in direct sunlight just like I would read a Kindle but anything less than full and direct sunshine makes the back-light-off setting completely useless.
Use a Special Power Saving Mode: Reading a document for an extended period of time on your netbook requires little to not effort on behalf of the computer. You can maximize your netbook's battery life as an e-book reader by setting up a special power saving mode just for the times you're using it as an e-book reader. Just switching it to the maximum power-saving mode won't cut it, putting your netbook in maximum power save usually has featured not conducive to reading like shutting the screen off after short periods of inactivity.
Your netbook may have an advanced power manager installed, but to quickly tweak the power settings in Windows you'll want to open up the Power Options menu. Right click on the battery icon in your system tray or look under Settings -> Power Management. You'll want to tweak your power settings so that the monitor never turns off, the hard disks spin down after 5 minutes—once you load an e-book to read it's in the memory of the computer and you won't likely need to do any heavy hard disk accessing—and set the system to never go into standby mode. With the brightness turned down and the hard disk kept quiet, you should be able to squeeze out quite a bit of reading time.
Your netbook may have an advanced power manager installed, but to quickly tweak the power settings in Windows you'll want to open up the Power Options menu. Right click on the battery icon in your system tray or look under Settings -> Power Management. You'll want to tweak your power settings so that the monitor never turns off, the hard disks spin down after 5 minutes—once you load an e-book to read it's in the memory of the computer and you won't likely need to do any heavy hard disk accessing—and set the system to never go into standby mode. With the brightness turned down and the hard disk kept quiet, you should be able to squeeze out quite a bit of reading time.
Setting Up E-Book Software
What e-book software you end up using is entirely a matter of personal preference, and the dealbreaker might be as tiny as what key is closest to your thumb when holding the netbook in a comfortable position and what that key does—turns the page, pages down, etc—in a particular e-book application. With that in mind, we'd urge you give each of the following free applications a test drive to see which one is the most comfortable option for your netbook, how you hold it, and your reading style.
 |
| Kindle |
I'm highlighting the Kindle for PC software first for only one reason. If you want to semi-recreate the experience of having a Kindle without actually buying a dedicated Kindle, you can install Kindle for PC on your netbook. Unless you absolutely want that experience we can see no reason at all to install Kindle for PC. You cannot manage your personal library of e-books and documents with Kindle for PC, so you're essentially importing the experience of having a DRM-locked down Kindle onto your netbook. If you have a lot of e-books already and don't have a relationship with Amazon as your e-book provider, Kindle for PC was a no-go right out of the gate for me.
 |
| Calibre |
Calibre is an open-source solution for not just reading e-books and other portable document formats but also organizing them in a meticulous fashion. Calibre isn't just a great option for viewing e-books in a vertical orientation on your netbook; it's a great option for organizing your collection, downloading news to read on your netbook-turned-e-book reader, and even syncing your collection to actual e-book readers if you decide to invest in one later on. Calibre supports nearly every portable document format out there, although less common formats like the CBR comic book container format require conversion—Calibre handles all the conversion in-program.

Mobipocket Reader has a similar layout to iTunes and gives you a more Kindle-like experience on the Netbook than the actual Kindle for PC software can provide. Where the Kindle for PC software falls flat and Calibre shines with organization, Mobipocket Reader stands out for having all the neat annotation, bookmarking, and interface tweaking aspects you find in the Kindle Reader but brought to Windows without all the DRM-hassle. If you've been pining for a Kindle but find the Kindle for PC experience to be lacking, it's worth checking out Mobipocket Reader for a bells-and-whistles portable reader. If you fall in love with Mobipocket Reader Desktop on your netbook you'll be pleased to know you can get versions for your Blackberry, Windows Mobile phone, Symbian phones, Palm, and several dedicated e-book devices. You can, of course, use just about any software you want as long as it can run on your OS and works when the orientation of the screen is rotated—good luck with Adobe Reader! We couldn't get most e-books to display correctly once rotated—which is the beauty of using a netbook over a hardware and firmware-locked dedicated e-book reader.
To DELL Mini 10 user,
if you buy an external dvd drive and it has nero,
*DO NOT INSTALL IT YOU WILL HAVE THE BLUE SCREEN OF DEATH*
*DO NOT INSTALL IT YOU WILL HAVE THE BLUE SCREEN OF DEATH*
took me ages to figure it out also google chrome ( i think) messed up the card slot. if this affects any other netbooks could you let me know.
Thứ Ba, 11 tháng 1, 2011
DEXTECH | Tablet Attack!
HP Slate vs Samsung Galaxy Tab vs Apple iPad vs RIM Blackberry Playbooks

Just Recently, RIM has announced its new Tablet-BlackBerry Tablet. Now Apple iPad has serious competition in Tablet Market against Samsung Galaxy Tab, HP Slate and BlackBerry PlayBook.

That's just on the hardware side, though. Apple's still got three major advantages that opponents haven't made up much space on: iOS, the App Store, and a huge head start. It's going to take more than a pair of HD cameras to overcome that.

GOSSiP : Apple's iPad 2 (2nd Generation)
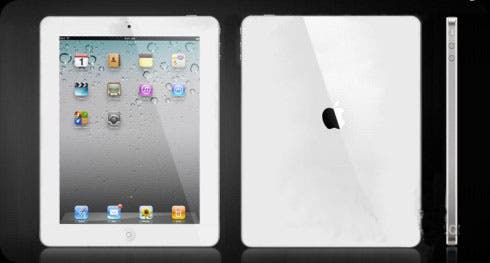
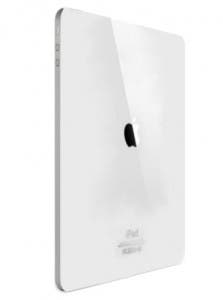
Pihak Foxconn telah mendapat notis dari Apple bagi rancangan untuk penghantaran iPad-2 pada Feb 2011, dengan penghantaran awal 400,000 600,000 unit, menurut DigiTimes. Sources expect the product to launch April 2011. Para peminat iPad mengharapkan pelancaran pada April 2011.
Ianya kemungkinan besar kerana generasi pertama iPad 1st generation dilancarkan pada bulan April tahun lalu. Apple's iPhones model/versinya dikeluarkan setiap tahun sama seperti Apple's iPad. .
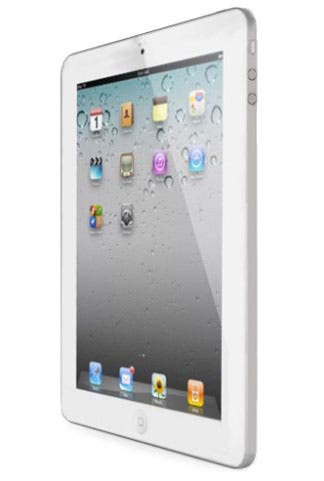
- Skrin “retina” sama seperti iPhone 4
- Kamera depan (front-facing) dan dilengkapi dengan aplikasi panggilan video "FaceTime"
- Menaik taraf sokongan "AirPlay streaming" (pendapat dari Steve Jobs)
Sementara itu, pada pendapat saya ada beberapa ciri yang diharapkan iaitu:
- Butang untuk "locks screen" seperti dulu (Apple telah menukar fungsi butang tersebut dari "lock screen" kepada "Mute-Mode"
- Menyediakan/meningkatkan integrasi/sokongan dengan Apple TV, dimana membolehkan menggunakan media-streaming dari Apple TV kepada Apple iPad (sekarang anda boleh melakukan sebaliknya). Dimana pada pendapat saya jika anda dapat menggunakan "Movie-Streaming" pada iPad 2 secara mobile memey netup !!!
Apakah ciri-ciri yang anda harapkan pada keluaran iPad-2 dan seterusnya?
Thứ Hai, 10 tháng 1, 2011
Cara untuk menggunakan Android OS/Chromium OS pada PC anda | MiG from v1

Android sekarang menjadi salah satu OS yang paling popular untuk Smartphone. Jika anda bercadang untuk membeli Android HP, anda mungkin ingin mencuba dulu! Kali ini saya akan menunjukkan cara untuk menggunakan Android OS (Android x86 1.6 r2) dan app/utility Android pada PC anda (WinXP 32bit/Win732bit) dengan menggunakan Virtualbox (Oracle).
1. Download dan install Virtualbox
2. Download Google Android x86 1.6 OS
- terdapat beberapa version android, disini saya gunakan Androidx86 1.6 r2, kerana ia merupakan version yang paling stabil.
3. Buka Virtual Box dan klik New.
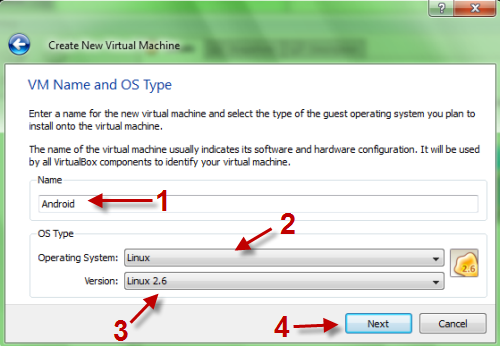
4. Create New Virtual Machine dan klik Next.
5. Nama VM anda, (contoh: Android-PC), kemudian pilih Linux sebagai sistem operasi, di dalam menu Version, pilih Linux 2.6. Klik Next.
6. Pada langkah berikutnya, anda perlu menetapkan saiz asas memori iaitu 256MB. Klik Next untuk ke langkah seterusnya.
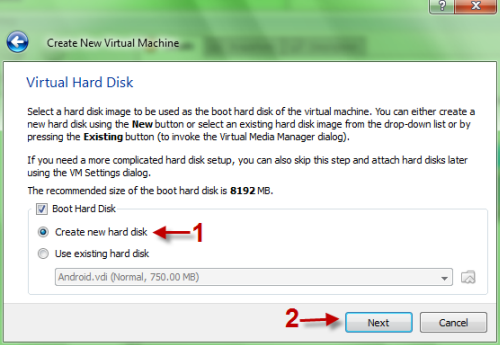
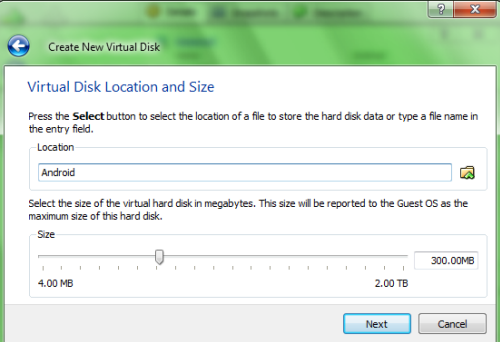
7. Pilih Create New Hard Disk dan klik Next. Pilih->Dynamically expanding storage->Klik Next->Namakan file VDI anda, setkan saiz (sekitar 300MB) ->Klik Next-> Finish-> Finish.
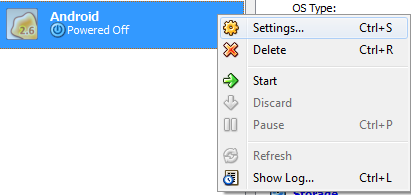
8. Sekarang kembali ke muka utama program Virtualbox, klik New Machine dan pilih Settings.
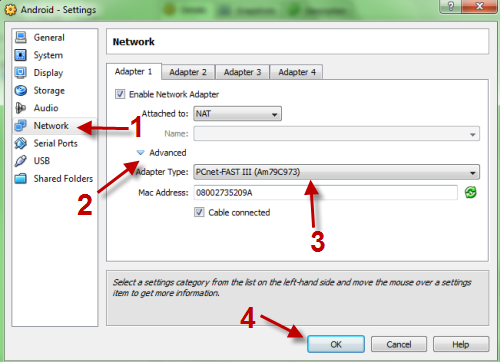
9. Dalam pop up baru, masuk ke pilihan Network, klik pada Advanced dan menetapkan jenis Adapter PCnet-FAST III. Klik OK untuk menyimpan tetapan. (Langkah ini sangat penting! Jika anda melewatkan langkah ini, mesin android anda mungkin tidak disambung ke internet, jadi kami tidak dapat men-download aplikasi dan surfing web)
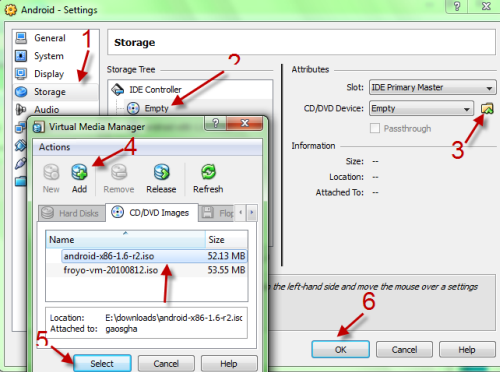
10. Pergi ke klik Storage option-> di klik Empty disk-> ikon Folder di sebelah kanan> pilih Add-> Point ke "android-x86-1.6-r2.iso" tadi-> Pilih-> Klik OK untuk menyimpan.
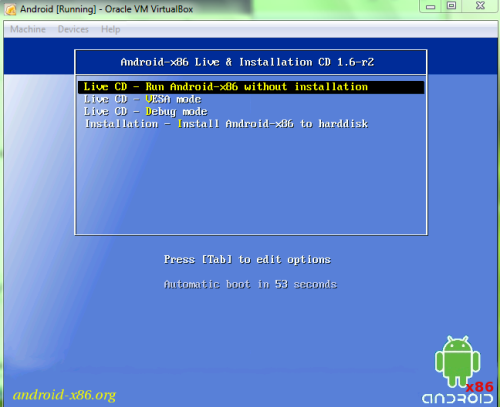
11. Klik Start untuk launch VM Android OS anda. Jika anda menghadapi amaran, tekan Enter. Pilih "Live CD – Run Android – x86 without installing."
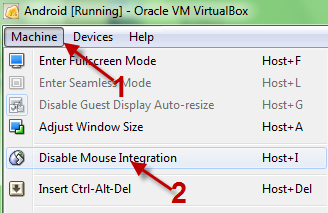
12. Ketika anda masuk ke Android OS, pergi ke Machine->Disable mouse intergration-> untuk menggunakan mouse didalam OS Android. (Bila anda menggunakan fungsi ini, anda tidak boleh menggunakan aplikasi lain Jika anda ingin berinteraksi dengan aplikasi,. Cukup tekan butang host "Ctrl kanan" untuk membawa kembali mouse biasa)
13. Pergi ke Setting Menu utama-> -> Aplikasi-> Pilih "Unknow Source->Klik OK untuk menyimpan semua tetapan

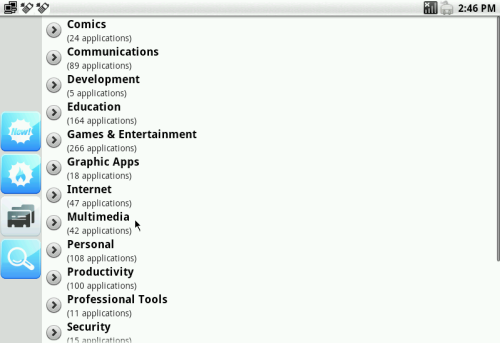
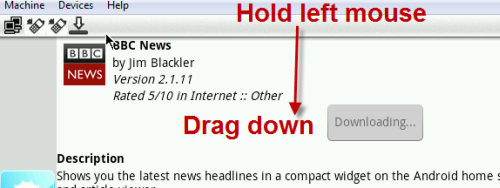
14. Sekarang, kembali ke menu utama (tekan ESC) dan pilih App Store. Kemudian anda boleh memilih perisian anda untuk mendownload. (Perisian dibagi mengikut kategori)
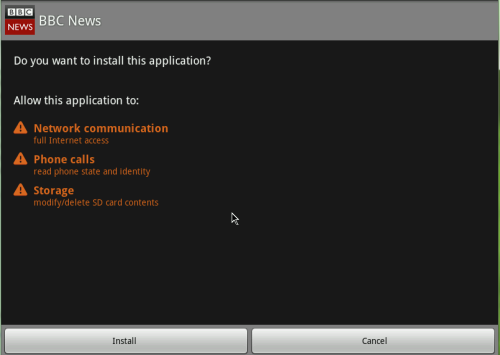
15. Apabila proses download selesai, 'Hold & Drag' ke bawah dari bahagian atas panel, pilih aplikasi dan kemudian anda boleh memasangnya tanpa masalah.
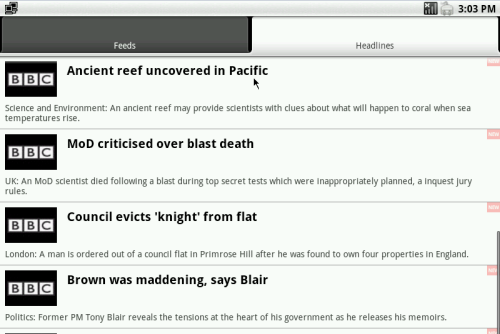
16. Selesai. Selamat mencuba...

*PS*
- Sesetengah aplikasi tidak berfungsi kerana mereka memerlukan peranti sebenar.
- App Store BUKAN Android Market, tidak semua aplikasi anda boleh download di sana.
- Android 2.2 masih belum stabil lagi tapi anda boleh mencubanya karana ia adalah versi terbaru.
- Jika anda mempunyai sebarang pertanyaan atau komen ;) silakan...

UTK CHROMIUM OS KLIK LINK DI BAWAH:
Maxis iPad Data Package Local Price

Yes! iPad is coming to town and it's just the right time for daddy, mammy, girl friend and boy friend stop scratching your head what to buy for Christmas.
It was started when I simply browse to http://maxis.com.my/ipad and it come to the page below;

Maxis offers both postpaid and prepaid plans for iPad.
The postpaid plans for iPad;
RM70 for 3.5GB = RM20/GB
RM90 for 6.0GB = RM15/GB
RM200 for 15GB = RM13.33/GB
As for the prepaid plads for iPad;
RM8 for 500MB with validity 1 day
RM18 for 500MB with validity 30 days
RM28 for 1.0GB with validity 30 days.
There are also pricelist of iPad leaked from MacStudio:
16GB WiFi = RM1,549
32GB WiFi = RM1,849
64GB WiFi = RM2,149
16GB WiFi + 3G = RM1,999
32GB WiFi + 3G = RM2,299
64GB WiFi + 3G = RM2,599
Not too sure the packages of the iPad with maxis plans, probably gonna be a great deal since the iPad without contract is so affordable.
I did also tried out http://digi.com.my/ipad it come to an expired link and redirect to the main page. I guess DiGi is not planning to bring iPad in. Seem that DiGi is not interested on this and probably a great move whereby rumor the 2nd generation of iPad maybe coming soon.
UPDATE [06/12/2010]
iPad officially available in Malaysia and none of the Telco Service Provider will be carrying the iPad device for time being.
The iPad would only be available with Apple Malaysia and can be purchased from;
Apple Premium Resellers:
• Epicentre, Pavilion Kuala Lumpur +603 2141 6278/ 6378
• Epicentre, IOI Mall, Kuala Lumpur +603 8075 0870/0871
• Machines, Lot 10, Shopping Centre +603 2142 5009
• Machines, Suria KLCC, Kuala Lumpur +03 2171 2633
• Machines, Mid Valley Megamall, Kuala Lumpur +603 2282 3996
• Machines, Sunway Pyramid, Selangor +603 5633 2998
• Machines, The Gardens, +603 2287 6787/ 5787
• Machines, City Square (Johor), +607 227 2606
• Mac Studio, Bangsar Shopping Centre, +603 2282 1799
• Mac Studio, Berjaya Times Square, +603 2145 1799 / 2143 1799 / 2143 9799
• Mac Studio, Plaza Low Yat, Kuala Lumpur +603 2145 4799/9799.
• Switch, Plaza Gurney, Penang +604 229 5591
• Switch, The Mines Shopping Fair, Selangor +603 8948 9591.
• AVE, Kinlap, Brunei
• Avelectronics, The Mall, Brunei
Apple Shop, Harvey Norman:
• Bukit Tinggi, +603 3326 2631
• Mid Valley +603 2282 2860
• Ikano PowerCentre, +603 7718 5200/5223
• Sunway Pyramid, +603 5622 1300
• Queensbay Mall, +604 630 8210.
Source (DiscoveryWeek)

DXv2 GUiDE | Withdraw PayPal funds to your Malaysia Bank Account in 3 steps

DEX | Tutorial/Guide about Paypal. Just in 3 steps you (Malaysian users) can now withdraw their PayPal money directly to their Malaysian Bank Accounts through MEPS. (21 total banks in Malaysia is supported)

The transaction will take up to 2-3 days, and a fee of RM3 will be charge if your withdrawel is below RM400. If your withdrawal is above RM400, no fees will be charge. The default withdrawal limit is RM2000 a month. You can lift this limit once you link and confirm your credit card on PayPal.
Below is a step by step guide on how to withdraw funds to your Malaysia bank account.
1. Login to your PayPal account and click "Withdraw".

2. Once your inside the withdraw window, click “withdraw to your bank account"
(you must add Bank Account to your PayPal Profile)

3. Specify your amount to withdraw and click "Continue"

Here are PayPal - MEPS Bank Routing Code - Malaysia
* Malaysia Bank Routing Code (also known as SWIFT Code)

How to Create Multiboot USB DVD ISO Images | XBOOT | MiG from v1

There are hundreds of Live CDs which are free of cost available on the Internet these days. Many of them are essential for a variety of purposes but one of the big issues is to carry a number of CD’s along, which is too much of a hassle.
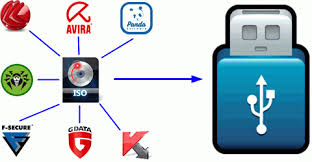
Nowadays everyone is aware of the benefits of ISO images. Many developers provide ISO images of their release for free download, especially in the antivirus and security niche but also in utility and Linux. But the problem that some users face is that there does not seem to be a way to combine multiple ISO images on an optical disk (like a CD or DVD) or USB device. That’s why Xboot has been created by its developer. This free application can combine multiple ISO images into one multiboot disk or USB device.

ISO images can be dragged and dropped into the main program interface. Each ISO is listed with its name, size, a category, file path and other information. The program will automatically calculate the combined file size and display it as the total size in the same program window. That’s helpful to keep below the maximum storage space of CDs, DVDs or USB sticks.
Another additional option, which is to calculate checksums is also provided which is useful to verify the integrity of an ISO image. ISO images can be added via the file menu as well which opens a file browser to select ISO images from connected storage devices. A click on Create ISO or Create USB creates the the multiboot ISO image or USB device. Any ISO image created this way needs to be burned to disk before it can be used.
Xboot is a helpful tool to add multiple ISO images to one multiboot ISO image or USB device where the creation process is easy to complete. It is compatible with 32-bit or 64-bit editions of Windows. The free software requires the Microsoft .NET Framework 4.0 on the computer system.
Đăng ký:
Bài đăng (Atom)