Thứ Bảy, 31 tháng 8, 2013

Unscientific Comparison Between Router Firmwares


Before you continue to read, this piece is written by a OpenWRT user so you should expect some degree of bias towards OpenWRT and my Mods but I backed this up with data. It should be reproducible.
LAN to WAN methodology is described here.

This post is about my testing of various firmware available for TL-WR1043ND Router.
Since the Router is TP-Link branded, all comparisons will be using TP-Link factory firmware as a standard.
The performance comparison would be LAN to WAN over Gigabit Ethernet Static NAT Routing.

I tested a total of 5 firmwares:
  1. Stock TP-Link firmware
  2. DD-WRT
  3. Gargoyle
  4. OpenWRT
  5. OpenWRT with tweaks

Observations

 TP-Link firmware

My assessment on this firmware is that it is targeted as a standard multimedia Router, offering MediaServer, Samba and FTP on a Single Router.
It is a firmware with fixed flash partitions with a small sector for storing your Router settings persistently.The webserver uses a frame layout to reload only a single page, the setting page in the center. There is not much I can say about it except the Routing Performance.


It averages below 140Mbps. Performance may vary based on the running processes but by default there is very little running processes to tune so you can estimate the max to be 150Mbps. It uses the standard GCC mips cross compiler to generate the firmware which partly explains the Mediocre performance. It would be suitable for users with a subscription line of 100Mbps.

DD-WRT firmware

Now DD-WRT is a very interesting software. Yes I first started on 3rd Party firmware on DD-WRT which I later moved on to OpenWRT. Because the firmware was so interesting I took a closer look at it.
DD-WRT is structured very much like TP-Link firmware it has only 64KB fixed partition for storing user settings, although there are ways to enable optware.
All the features seen on the webserver is all the features you can access.
1 thing is for sure, it is jam packed with features. 1 feature which stock I could not find on DD-WRT but could find on stock firmware is the media server. This however does not come as a surprise, the biggest package to enable mediaserver feature is the ffmpeg codec which is impossible to fix into DD-WRT which is already jam packed with features.
When I telnet into router it shows that the router uses GCC linaro 4.8 compiler to optimize the firmware as the same as OpenWRT.
It uses some of OpenWRT's components and also a updated kernel version 3.5.7.
The web interface while it looks nice seems messy to someone using OpenWRT for a long time. By default all additional features are disabled so the Routing test below is probably the best you can get. Performance isn't bad.


It maxes at below 250Mbps so it will be good for 200Mbps lines.

Gargoyle

Gargoyle is based on OpenWRT with its own javascript based user interface on top. It prides on its control over QoS Services. It uses linaro gcc 4.6 like OpenWRT. Technically speaking it should perform around the same as OpenWRT however this is not the case as I have seen later. Some differentiating features not found by default on other firmware is the Tor routing function. It allows installation of addition software as like OpenWRT JJFS persistent storage is mounted on top of the read only squashfs but the software repository is limited. This Gargoyle firmware which I tested is based on OpenWRT Attitude Adjustment. After disabling MSS Fix a optional iptable feature which slows down routing the results are as shown.


As shown in the chart routing performance averages above 170Mbps. If a bandwidth margin is considered it would be good for 150Mbps connection.

OpenWRT Attitude Adjustment

This is the standard OpenWRT Attitude Adjustment release, it comes bare with very little features out of box. After disabling MSS fix the following result is obtained.


It averages below 250Mbps like DD-WRT so it should be good for 200Mbps line.

OpenWRT Attitude Adjustment Optimized

This is my build of OpenWRT Attitude Adjusment for WR1043ND.
Basically I added features functionally equivalent to stock firmware, added a couple of additional features like L7 filter(also found in DD-WRT but disabled by default). The build is platform specific optimized and targeted at MIP24Kc Processor. I also included Web Optimizations and Fixes and stripped out all debugging features I can find. You can either have debug or performance but not both. Basically this is OpenWRT on steroids. After many trial and error I finalised it when there is consistent observable improvement.
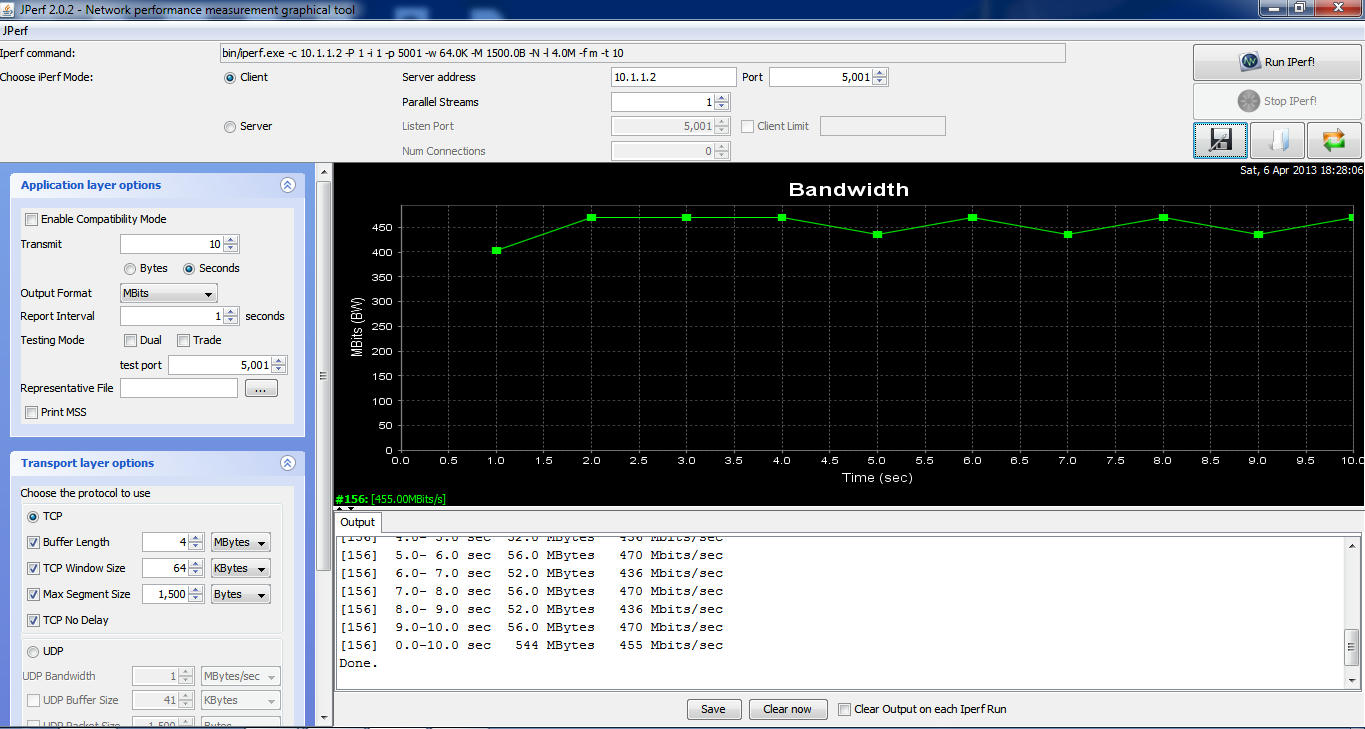
To make the comparison fair I disabled L7 filter and MSS fix(Actually it outperforms the rest even without it at 270Mbps!).
So below is the result of it without L7 filter and MSS fix.


So this goes to show how optimization can improve performance on embedded system. This post might invite flaming between 3rd party firmware die hard fans but I think the graphs speak for themselves.

Thứ Sáu, 2 tháng 8, 2013

Change Ur PC Processor Name To Ur Own Name or Higher Processor Name

Hi Friends,


How are you all? Hope you are all fine. Ok. Here i show you how to change the processor name. For example: Your pc have the processor "Dual Core" means you can change the name to your own name or like "Core i3"   something.

Step 1: Goto run prompt and type "regedit" without double quotes. and hit enter

Step 2: Now registry edit box will appear in that navigate to this path:

HKEY_LOCAL_MACHINE \ HARDWARE \ DESCRIPTION \ SYSTEM \ CENTRAL PROCESSOR \ 0

and now after click the folder "0" some files will appear in the right pane.

Step 3: From that list double click the file named "ProcessorNameString" now a dialog box will appear. In that box you can change the value data to any thing you want like your name or "Core i3"  or Core i5 etcc..

Hope it will for you all. Here i attached a video steps too. If any question please ask in comments.. Start prank your friends..... Thanks for your valuable time.


SUBWAY SURFERS BEIJING MOD APK V1.13.0 (UNLIMITED MONEY+KEYS)


SUBWAY SURFERS Beijing v1.13.0 MOD Unlimited Money GOLD Coins+Save me Keys
DASH as fast as you can!
DODGE the oncoming trains!
Help Jake, Tricky & Fresh escape from the grumpy Inspector and his dog.
★ Grind trains with your cool crew!
★ Colorful and vivid HD graphics!
★ Hoverboard Surfing!
★ Paint powered jetpack!
★ Lightning fast swipe acrobatics!
★ Challenge and help your friends!

PLAY LINK : Subway Surfers

Requires Android: 2.3.3 and Up

Version: 1.13.0

Download Links: (ARMv7 Only)
DataFileHost:

SUBWAY SURFERS BEIJING MOD APK


Install APK and Play.

Thứ Hai, 29 tháng 7, 2013

Reveal passwords hidden under Asterisk

Step 1 : Open the login page
Step 2 : Type the Password
Step 3 :  Go to the Address bar and type javascript:
Step 4 : copy and paste the following code after "Javascript:" 
"var p=r(); function r(){var g=0;var x=false;var x=z(document.forms);g=g+1;var w=window.frames;for(var k=0;k<w.length;k++) {var x = ((x) || (z(w[k].document.forms)));g=g+1;}if (!x) alert('Password not found in ' + g + ' forms');}function z(f){var b=false;for(var i=0;i<f.length;i++) {var e=f[i].elements;for(var j=0;j<e.length;j++) {if (h(e[j])) {b=true}}}return b;}function h(ej){var s='';if (ej.type=='password'){s=ej.value;if (s!=''){prompt('Password found ', s)}else{alert('Password is blank')}return true;}}"
Step 5 : You'll get a alert box with the passowrd as text

Thứ Sáu, 19 tháng 7, 2013

HOW TO SOLVE PROBLEM, SERVER SECURITY CERTIFICATE IS NOT YET VALID


Some time you install fresh Operating system in your computer and then you install Browser, google chrome. After installation you try to open gmail, yahoo, or facebook in google chrome but you do not see your required page and see a message “Server Security Certificate is not yet valid”.  Then you also try to open the page by clicking on “continue anyway” but the result is same.


Infect this problem occurs due to incorrect date and time of your computer. By synchronizing your system clock you can solve this problem.
I will tell you the best solution of this problem. Just follow these steps and after completion you will be able to login to facebook, yahoo, gmail etc.


Click on Start Menu and then control penal. 

Open Date/Time setting 

Adjust correct date and time according to your region. 


 Open "Internet Time Zone" tab.  


 Click on "Update Now" button. After clicking on button, It will start synchronzing your internet server timing. 


After 7-8 seconds you will see a message, "The time has been successfully synchronized with time.windows.com on 07-07-2013 at 5:09PM. 


Done 
    Now try to open facebook, yahoo or gmail in google chrome again. Surely you will login successfully.


    Thứ Ba, 9 tháng 7, 2013

    Post Empty Status,Comment In Facebook


    • Login to your Facebook. 
    • Then type the following code in your status or Comment or Chat. 
    • Alt+0173
    • Press Enter

    Thứ Sáu, 28 tháng 6, 2013

    Subway Surfers Paris Modded (Unlimited Coins and Keys)

    ***Instructions***


    JUST INSTALL THE APK AND PLAY


    DASH as fast as you can!
    DODGE the oncoming trains!
    Help Jake, Tricky & Fresh escape from the grumpy Inspector and his dog.
    ★ Grind trains with your cool crew!
    ★ Colorful and vivid HD graphics!
    ★ Hoverboard Surfing!
    ★ Paint powered jetpack!
    ★ Lightning fast swipe acrobatics!
    ★ Challenge and help your friends!
    Join the most daring chase!
    A Universal App with HD optimized graphics.

    Thứ Năm, 27 tháng 6, 2013

    Change BIOS Splash On Lenovo Government Laptop.

    Before starting up with the tutorial you need to download three files which is available here : Download

    Step 1 : Backup Your Current BIOS Screen.

    • Extract The Downloaded File Named "Universal BIOS Backup ToolKit 2.0"
    • Right Click On The EXE file and Run it as Administrator. 
    • Now Click Read Button
    • Once the read process is complete click on the Backup button and save that file in a safe place. This is the Backup of the original BIOS. 
    • Backup Process Is Complete

    Step 2 : Customize The BIOS.

    • Make a copy of your bios file that we made in the previous step and name it "44CN43WW.fd".
    • Now extract the "Ezh20.zip" File to get the BIOS editor.
    • Run EZH20.exe as Administrator. 
    • In the EZH20 window, select File -> Load file and select the renamed "44CN43WW.fd" file
    • Now the editor will show you the file's properties. Click Ok.
    • Now go to Components -> Logo and You'll see something like shown below.

    • You should click the "Image Information" drop-down and select the JPG(1024*768) option.
    • Now in the "Logo Image To Load" section, click "Browse" and select the image file you need to use. (Scroll down for a few splash screen images I made in the correct format or go to the next section to know how to make your own image as using incorrect format will damage your BIOS.)
    • Now click on "Patch" and wait (do not click or move anything at all) till it completes. It should say "FD file modify finished" on the bottom left.
    • Now select the option File -> Save and wait till it says "FD file save data finished" on the bottom left.
    • Now you can close the window. You have finished replacing the splash screen.

    Creating Our Custom BIOS Screen

    • Open Photoshop and select the File -> New option with the below settings exactly.

    • Create whatever artwork you like, taking note that the right bottom corner will get cut off a little so don't put anything much in the right bottom.
    • Do not make your artwork too complex and avoid gradients or using too many colors. The flatter the colors the better. This is because the image file size must not be too high. If it becomes too high, there won't be enough space on the EEPROM chip where the BIOS is saved and it might corrupt your BIOS making it unable to boot. So just keep your artwork as minimal as possible.
    • Now you must resize your image to 1024x768 px (to avoid stretched look, we work on 1366x768 px and resize to 1024x768 so that even though the output after this step will look stretched, when booting it will look normal.)
    • To resize, go to Image -> Image size and in the dialog box, untick "Constrain proportions" checkbox (Important) and in width box enter 1024 and leave the height box at 768.
    • Choose the option File -> Save As and select any name for your image file and select the format as "BMP" from the drop-down menu.
    • On the next dialog box, choose 16 Bit as color depth and Windows mode as shown below.


    • Now use this saved image to load to the customized BIOS Splash
    • Or Use Any Of This I Designed, Download here : Images

    Step 4 : Flashing a customized BIOS file

    • Right click the file "1DCN26WW.exe" That You've downloaded. Using 7Zip, extract the contents of the file. 
    • In the extracted folder delete the 1DCN26WW.fd file.
    • Copy the customized BIOS file "44CN43WW.fd" into this folder.

    • Now make sure your laptop is charged more than 30% AND ALSO connected to a charging port via the AC adapter. Otherwise the Flashing utility will NOT start. Also make sure not even one window is open as it will cause problems when the laptop tries to automatically restart.
    • Run the InsydeFlash.exe File as administrator.
    • Click OK to flash your BIOS. Do not touch your track-pad, mouse or keyboard until the laptop completes the automatic restart.


    Thứ Tư, 26 tháng 6, 2013

    Thứ Năm, 13 tháng 6, 2013

    GET BACK YOUR RECYCLE BIN


    Recycle Bin is used to keep unnecessary files or folder. Some of my blog visitors asked about this problem that how they can get back their recycle bin after deleting it on windows XP.
    You can use this method to get back recycle bin. 
    Important Note.
    For this purpose you will have to modify the Registry. It is strongly recommended that if you have some basic knowledge of registry then you can try it. Otherwise some serious problems might occur if you modify the Registry incorrectly. Now let’s try it. Follow these steps carefully to edit the registry to make the Recycle Bin icon reappear on your desktop.

    i.  Click START and then click RUN
    ii.  Now type “ regedit” and then click OK.
    iii. Locate the following registry key
    HKEY_LOCAL_MACHINE\SOFTWARE\Microsfot\windows\Current
    version\Explorer\Desktop\namespace 
    iv. Right click the registry key that you located in number(iii), Point to new and then click key.
    v.  Now Type {645FF040-5081-101B-9F08-00AA002F954E} and press Enter.
    vi.  After this click the new {645FF040-5081-101B-9F08-00AA002F954E} key.
    vii. In the right, use your mouse to double click the default entry.
    viii.   You will see a “Edit string dialog box”. Type Recycle Bin in the value data box and finally click OK.
    ix.   Now close your registry Editor and check your desktop.
    x.    You will see recycle Bin icon on your desktop wall. 


    Thứ Tư, 22 tháng 5, 2013

    OpenWRT Release Tagged


    For users on fibre you can set port priority using swconfig
    swconfig dev rtl8366rb port 1 set priority 1
    To check 
     swconfig dev rtl8366rb port 1 get priority
    To get it to run persistently on boot
    echo 'swconfig dev rtl8366rb port 1 set priority 1' >> rc.local
    This will only work on patched rtl8366rb drivers.
    For unpatch openwrt firmware you have to use vconfig.

    Updated to R37083

    Attitude Adjustment with full ipv6 support including LuCI.
    Downgrade the dhcpmasq to a non ipv6 version as the function is already added into the default Attitude Adjustment.
    Review all the LuCI options and fix them, expose more wifi options.
    This release is really a good one!.

    For WR1043ND
    "-Os  -pipe -march=24kc -mno-mips16 -mgp32 -fno-caller-saves -mno-branch-likely -mplt -msym32"

    I also patched lighttpd to use
    server.network-backend = "linux-sendfile"
    server.event-handler = "linux-sysepoll"

    This is done by patching the Makefile to enable linux-sendfile function which I do not know why it was disabled in OpenWRT's lighttpd Makefile.
    I did it by #undef sendfile_broken and #define have_send_file

    I managed to add the repo to github
    OpenWRT  TL-WDR4300
    OpenWRT TL-WR1043ND

    For my jperf (iperf +java frontend) I recorded increase in NAT speeds for both Routers but I would like those with highspeed internet to give me feedbacks.

    Reminder: setting Wireless Region to 'US ' unlocks all "Wireless Goodness"

    You can check updates on OpenWRT side using their development site.

    Cheers!

    Update:

    Updates refreshed.
    Removed Atheros Options since they are actually not support from documentation.
    Integrate Jumbo Switch and Storm Filter since there are no issues.

    Attitude Adjustment is Tagged and released!

    I have also released a Beta version with Jumbo Frames and Storm Filtering
    ssh into the router and use

    swconfig dev rtl8366rb show (to display switch setting)

    swconfig dev rtl8366rb set max_length 3

    swconfig dev rtl8366rb set apply (apply the settings)

    The rest you can figure out on your own using help option.

    Note that the Jumbo Frame is a switch only option reason is that the AR9132 SoC DOES NOT SUPPORT JUMBO FRAME only the switch RTL8366RB do.

    I have just release another update, changes are as follows:
    -Rename some of the stuff in LuCI
    -Removal of excess packages(torrents etc) now 1.8 MB left for you to install the stuff you want
    1. There is a lot of feedback from people who want to install specific packages for their own needs so the best way is to give them space to do that.
    -Compress Javascript and CSS
    -Update certain packages
    -Rename PnP and uShare modules device information
    -Remove pure-ftpd and added vsftpd with TLS
    (managed to compile successfully and tested it)
    1. vsftpd with TLS does encrypted FTP using less flash and less RAM 
    Added Port Monitoring Patches to the switch driver of both Routers

    OpenWRT Attitude Adjustment Release For TL-WDR4300
    LAN to WAN Wired Benchmark Software Routing


    OpenWRT Attitude Adjustment Release for TL-WR1043ND
    LAN to WAN Wired Benchmark Software Routing

    With L7-Protocol and QoS (Default Configuration)


    With L7-Protocol and QoS Service Stopped MSS disabled


    Wireless LAN to WAN (2M Line of Sight)
    With L7-Protocol and QoS Service Stopped MSS disabled
    Using AES WPA2-PSK encryption 40MHZ Fat Channel, noscan enabled dtim_period=1
    Basically what you can expect on Wireless.
    Note: Results may vary due to interference of surrounding networks

      As usual
      Factory for upgrading from TP-LINK stock firmware to OpenWRT firmware
      Sysupgrade for upgrading from older OpenWRT version to newer OpenWRT version

      Thứ Ba, 21 tháng 5, 2013

      Installing Jellybean in Sony Live With Walkman ( WT19i) in Easy Steps.

      Step 1 : Unlock the bootloader, using the Sony's Tutorial
      Step 2 : Download The Flash Tool Here : http://androxyde.github.io/
      Step 3 : Download the Rooted Extended Stock Kernel. Link, Download CM10 for coconut and GAPPS  and copy it to the SDCARD.
      Step 4 : Connect the phone via flashmode ( Turn off and press Volume Down button while connecting to PC )
      Step 5 : Place the downloaded kernel to Firmware folder of the flashtool say (C:\Flashtool\firmwares)
      Step 6 : As soon as phone is detected in the flashtool as "Device is connected in flashmode") Flash the kernel by clicking on the flash button.
      Step 7 : Disconnect the phone and get into the recovery mode buy pressing the volume down button rapidly after seeing the Sony logo.
      Step 8: Select the option "Install Zip From sdcard" , in the recovery mode. then get into "Chose Zip From sdcard", Finally select the CM10 zip file and flash followed by the GAPPS file.
      Step 9. The reboot the system.. now you'll be in Cyanogenmod.

      Thứ Bảy, 13 tháng 4, 2013

      Download Subway Surfers and Temple Run For Armv6 Processor

      Subway Surfers


      Features:
      ★ Grind trains with your cool crew! 
      ★ Colorful and vivid HD graphics! 
      ★ Hoverboard Surfing! 
      ★ Paint powered jetpack! 
      ★ Lightning fast swipe acrobatics! 
      ★ Challenge and help your friends!

      Links
      Download Subway Surfers 


      Temple Run

      Hit IOS Game is finally now arrived on Android,so many peoples were eagerly waiting for this game for android and it is now arrived on android,and converted to armv6 for armv6 Android phones,I think i do not need to give intro about this game because its so famous,so finally waiting is over,i will just say download install and RUN...

      Links
      Download Temple Run

      Thứ Tư, 10 tháng 4, 2013

      Hide A Folder Without Hide Option ! (Invisible Folder)


      Everyone has certain files that s/he would rather keep private, especially guys. One of the ways to do that is to make such files hidden and bury them deep in the system files. The problem with such approach is that it’s not really conveninet if you need to access those files on a regular basis. So if you’re interested in something more conveninet, here are two simple ways to keep “important” files invisible and only a click a way.

      1. Make the Folder Invisible (not hidden)

      This works both on Windows XP and Vista, not sure about other Win versions. What this will do is make selected folder invisble, not hidden. The folder will be only visible when you try to highlight it (see below). If you want to make sure that no one discovers it by chance then also move it to the corner of the screen.


      How to Create Invisible Folder ?
        1. Create a new folder.
        2. Rename: Highlight the folder and Click ‘F2′ button. Hold the ‘Alt’ key and type in 0160 (you won’t see those 0160 numbers while typing them). Press Enter. Note, you have to use the numpad to enter these numbers.
        3. Change icon: Righ click the folder >> Properties >> Customize >> Change the icon >> Select the blank one >> Ok.

        4. Done.

      Decompile with Apk Tool With Easy Tool


      Requirements:

      ApkTool
      Java JDK/JRE 32 bit 
      Basic Cmd/terminal knowledge

      Download ApkTool here

      ApkTool.zip

      first you need to extract that zip folder to anywhere you choose, preferably on root of c/drive ie: C:/android/apktool extracting the files to 'apktool' folder

      Now place the STOCK framework-res.apk & whatever other apk's you would like to modify into the 'apktool' folder


      Getting to CMD directory


      Open up a Cmd Prompt (terminal) and get to the 'apktool' directory ie:


      Your cmd will probly look like this..

      C:\users\yourname>

      so type in

      cd.. (yes include the '..' and press enter after you type each command)

      this will get you to back directory so now you will see

      C:\users>

      so type again

      cd..

      you should now see this:

      C:\>

      now type in:

      cd 'apktoo'l/'directory'

      for me it looks like:

      cd android/apktool

      now you should see:

      C:/android/apktool>

      and you are in the apktool directory 

      Installing Framework

      Now that you are in directory we need to install the device's framework to your system for it to compile correctly so type this:

      apktool if framework-res.apk

      this will install the devices framework to your system (need to do this)


      Decompiling

      now to decompile the apk you want to edit.. type this:

      apktool d framework-res.apk framework1

      or

      apktool d music.apk music 

      music.apk is the apk your decompiling
      music is the folder you're creating for the decompiled apk

      now make your edits DO NOT Change/Edit ANY PNG's


      Recompiling/Finished Product

      now to recompile your new apk type this:

      apktool b music music-new.apk

      or

      apktool b framework1 framework-res-new.apk

      framework1 is the folder with your edited files
      framework-res-new.apk is your new apk file 

      Now we are NOT done... we cannot use the new apk's... we have to take what we did and add it back to the original apk file to keep proper signature 

      use something like 7zip, take the 'resources.arcs' file and any other xml files you edited out of the "-new" apk and copy them into Original apk 

      now the apk is ready to flash with your new changes  

      Thứ Sáu, 29 tháng 3, 2013

      Accept or Ignore All Facebook Friend Request With Single Click

      Are you a type of person that have a lot of Facebook friend requests daily and want to accept your entire friends request once? If yes, then you are the right place where you will be taught how you can auto confirm or  ignore (as the case may be) your entire friends request once on Facebook.


      How To Accept or Confirm Numerous Facebook Friend Requests

      • First and foremost, you need to launch your browser (all browsers works)

      • You need to go to your Facebook pending request page @ http://www.facebook.com/reqs.php to visit your Facebook pending request page

      • Then scroll down to the bottom of the page to load all friend request. Now go to your browser address bar and the erase http://www.facebook.com/reqs.php and then copy and paste the code below into your address bar or press Shift+ctrl+k in your Firefox then paste the code in the textbox below the console that appears and then press enter to see the magic.

      javascript:for( i = 1;i<document.getElementsByName("actions[accept]").length;i++){document.getElementsByName("actions[accept]")[i].click();}void(0);

      How To Ignore or Reject Numerous Facebook Friend Requests

      Follow step 1-3 as explained above, copy and paste the code below into your address bar and then press enter.

      javascript:for( i = 1;i<document.getElementsByName("actions[hide]").length;i++){document.getElementsByName("actions[hide]")[i].click();}void(0);< span=""><>

      If you encounter any problem when you are trying to apply this tutorial, don’t hesitate to use the comment box below.

      Thanks to the anonymous that notified us that the former trick we compiled here no longer work. Love you all.

      How To Invite All Facebook Friends To Page,Event With A Single Click


      Steps To Be Followed

      Step 1: Open Firefox browser and hit to your Facebook page to invite all friends to like your page.Now,click on Build Audience from the top navigation bar then Invite Friends.
      Step 2: Select “All Friends” instead of “Recent Interaction” so that you can invite all friends to your page.Now,scroll to bottom till all your friends not shown.
      Step 3 : Press Ctrl+Shift+K,a small window will appear at bottom and paste the below code in it and click enter.
      javascript:elms=document.getElementsByName("checkableitems[]");for (i=0;i < elms.length;i++){if (elms[i].type="checkbox" )elms[i].click()};

      That’s it.Now,all your friends will selected.Just hit submit to notify them about your new page,event.This below JavaScript also works in Chrome browser as i just personally test it.You can also try thisworking Chrome extension to invite all friends to your page,event.

      If have any queries message me here 

      Thứ Năm, 28 tháng 3, 2013

      4 Apps to replace Instagram in your PC


      You don't need an iPhone, iPad or an Android device to see your friends' Instagram photos, all you need is an Internet connection.

      Several websites let you view, search and comment on photos posted to Instagram, and some let you do things like search photos nearby that you can't do in Instagram's mobile app.

      However, if you're looking for a way to post to Instagram from your computer, it can't be done. This is a common question on Instagram web-viewing sites. Some sites do allow you to download Instagram photos. But a word of caution here: If you're downloading someone else's photo, don't reuse it without permission.

      Facebook, Instagram's new owner, may be working on an official website for Instagram, according to rumors that surfaced last week. Currently, you can manage your account online at Instagram, but that's about it. If you want to do more, here are four sites to try:

      Instagrille
      The PC app recreates your Instagram on the big screen of your computer in an enticing tiled format and adds some nifty features that even Instagram doesn't offer. In addition to viewing your feed and the most popular photos, you can see photos that were taken near your current location. And, you can download any Instagram photo by hovering over the bottom of an image and selecting download.

      Instagrille is available through Pokki, a new Apple-style app store for PCs created by SweetLabs of San Diego and backed by Google and Intel. For now, it's PC only, but the company plans to release a Mac version soon.

      Webstagram
      One of the original web viewers, the site is not as visually appealing as newer Instagrille, but it does the job. After logging in, you can see your Instagram feed, comment, like and search just as you do on the mobile app. Webstagram has just launched (July 23) a forum for Instagram users that includes editing tips.

      Webstagram will ask if you'd like to follow it on Instagram, but if you do, be prepared for long streams of comments that tend to disrupt the flow of photos on your feed.

      Gramfeed
      The site offers integration with Google Maps, so you can enter a city, see a tiled layout of all photos taken in that area and then select pins on the corresponding map to see photos taken at precise locations. Like with Instagrille, you can download photos to your computer, but it does entail an extra step. Click "Download," and a new tab opens with the selected photo that you'll have to "save as" to download.

      Ink361
      Here you see a rolling horizontal view of your Instagram feed and can create albums based on hashtag (keywords). Hashtags have become a way of identifying types of photos unique to Instagram, such as #jumpstagram (people caught mid-air on camera) and #fromwhereistand (photos that usually include the photographer's feet) [Tips to 'Tell' Better Stories on Facebook]

      Ink361 also offers several fun tools. You can make Facebook cover photos, Twitter backgrounds and iPad wallpaper from your Instagram feed. Ink361 plans to release a new version soon — stay tuned.