Thứ Sáu, 20 tháng 8, 2010

Acer Aspire 4740G on OpenSUSE (Perfect Linux Machine)


As I said AS4740 works well with Linux but you still need to do some tweaking for full functionality.
A lot of things you do with AS4530 is done with AS4740 to achieve full multimedia capability.

Edit: As with the new release openSUSE there are some updates:
1)Multimedia configuration is as shown below still the same manual work due to GPL.
2)Edit Nvidia Driver Repo is up just add the server and install the drivers.
3)You no longer need acpi_vendor commandline...issue resolved
4)Touchpad still jumpy with 2 fingers...
5)Atheros Driver no compiling required since the drivers work pretty well out of box.

In conclusion it is a great release solving some of the issues above just that the nvidia delay is a show stopper. I always like openSUSE elegant way of pushing down Nvidia Driver by server repo too bad they didn't get it out the same time as the distro release.

Lets get started:

First go to OpenSUSE to download their Live CD for 32/64bit according to your needs.
The LiveCD is the size of a Normal CD and just what you need to install OpenSUSE, the DVD format is a waste of bandwidth and a overkill.

Everything works out of box except the display driver.

Things that need tweaking:
  • Nvidia Propriety Drivers.
OpenSUSE is interesting because Nvidia provides the driver updates from their own server.
Other Distro like Ubuntu has a 3rd party maintaining the driver but not OpenSUSE however due to licensing issues they cannnot include it in the default install.

After installing add the Nvidia Server to the repository
SYSTEM,  SYSTEM ,YAST

Software,Software Repo

Add
Protocol:HTTP
Server:download.nvidia.com (See Nvidia provides the direct package)
Directory on Server: /opensuse/11.2
Accept the Server Key (because you trust the server)
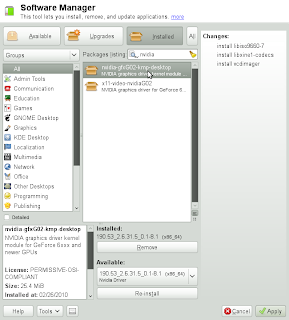
From the YAST Menu, Select Software Management search for the Nvidia Driver and install it.
The kicker is that OpenSUSE software updates is IRRITATINGLY SLOW.
So bear with it.

After installing and rebooting it will be automatically activated.


  • Restricted Formats
Due to licensing issues OpenSUSE doesn't have restricted format support out of box but they are downloadable here (Unfortunately the libraries broke the cheese webcam functionality).

Edit: To prevent breaking of the cheese webcam functionality do the following:

Add VLC to the software repository(Use VLC to play all your future videos)
Then use Fluedo Codec for Banshee
After this the webcam functionality will be preserved.

You might also want to do the following configuration of the conf files below.

Edit: /etc/sudoers
Append "DISPLAY" as shown below
Defaults env_keep = "LANG LC_ADDRESS LC_CTYPE LC_COLLATE LC_IDENTIFICATION LC_MEASUREMENT LC_MESSAGES LC_MONETARY LC_NAME LC_NUMERIC LC_PAPER LC_TELEPHONE LC_TIME LC_ALL LANGUAGE LINGUAS XDG_SESSION_COOKIE DISPLAY"

The reason so you can sudo something in GNOME Desktop Mode.

Edit /etc/fstab
Add noatime to the line of your main disk partition so it will not write last access date to your Harddisk (Less unnnessary harddisk operations)

Add this line to /etc/fstab to make /tmp folder a RAMDisk so /tmp will be automatically cleared during shutdown.
tmp              /tmp            tmpfs    defaults,size=512m,noatime,nodiratime    0 0
The size allocated is 512MB.
Open YAST select bootloader
Rename the Windows 7 Entry to something you like.
Rename the OpenSUSE Entry to something you like. 
Set the default OS to something you use more often.
Add acpi_osi=Linux to the end of the OpenSUSE boot parameters


Issue #1 Touchpad Multi-Touch (There is still a problem with jumping cursors with multi fingers so it is better to revert to Scroll Bar it should be fixed in the future) :

Create a config file using the data below.
Name it: 11-x11-synaptics.fdi
copy it to the following folder with root permission:/etc/hal/fdi/policy


The synaptics pad may not support true multitouch. However, we emulate multitouch when the width of the touch is greater than 6 units:
<?xml version="1.0" encoding="ISO-8859-1"?>
<deviceinfo version="0.2">
<device>
<match key="info.capabilities" contains="input.touchpad">
<merge key="input.x11_driver" type="string">synaptics</merge>
<merge key="input.x11_options.SHMConfig" type="string">On</merge>
<merge key="input.x11_options.EmulateTwoFingerMinZ" type="string">50</merge>
<merge key="input.x11_options.EmulateTwoFingerMinW" type="string">5</merge>
<merge key="input.x11_options.VertTwoFingerScroll" type="string">1</merge>
<merge key="input.x11_options.HorizTwoFingerScroll" type="string">1</merge>
<merge key="input.x11_options.TapButton1" type="string">1</merge>
<merge key="input.x11_options.TapButton2" type="string">3</merge>
<merge key="input.x11_options.TapButton3" type="string">2</merge>
</match>
</device>
</deviceinfo>
 

Then enable 2 finger scroll as shown below

Issue 2: Brightness Control
Add the follow to the Boot Loader Command Line as shown below
: acpi_backlight=vendor
Issue 3: Weak Wireless Signal
Add Atheros Repository to YAST


Then go to the install software menu it will recommend you to install atheros driver and madwifi.
However this doesn't solve the issue as signal is still weak you must grab the latest driver from source and compile it.
Sounds tough? It is actually quite simple.

Compiling it yourself using the sources

  • Make sure you have installed those packages: gcc, gcc-g++, make, kernel-source, kernel-XXX-devel (where XXX is the type of your kernel, for example if you use kernel-desktop kernel install kernel-desktop-devel package). If not, please install them using YaST.
  • Download the current drivers directly from MadWifi Project.
  • Unpack the archive in a temporary folder.
  • Open up a terminal window.
  • Switch to the temporary folder, and type in,
$ sudo make 
$ sudo make install
 
To load the new driver modules simply restart if you do not want to load the driver module manually.

Issue 4 Microphone
This is simply just set as shown below

For best Font Display use the following Settings in Appearance:
Select Detail


Select Slight Hinting or None instead of Full

OpenSUSE on Aspire 4530

I took a switch to OpenSUSE because I could no longer stand the Brown and the fugly name Ubuntu.
Before I finally chose OpenSUSE I was deciding whether to try Fedora as well. However UI of Fedora was rather similar to Ubuntu so I tried OpenSUSE instead.
The Green Theme of OpenSUSE will match the Green Tag of Aspire 4530 (just below the keyboard) very well.  Owners of Aspire 4530 will know what I mean. LOL

Lets get started:

First go to OpenSUSE to download their Live CD for 32/64bit according to your needs.
The LiveCD is the size of a Normal CD and just what you need to install OpenSUSE, the DVD format is a waste of bandwidth and a overkill.

Everything works out of box except the display driver.

Things that need tweaking:
  • Nvidia Propriety Drivers.
OpenSUSE is interesting because Nvidia provides the driver updates from their own server.
Other Distro like Ubuntu has a 3rd party maintaining the driver but not OpenSUSE however due to licensing issues they cannnot include it in the default install.

After installing add the Nvidia Server to the repository
SYSTEM,  SYSTEM ,YAST

Software,Software Repo

Add
Protocol:HTTP
Server:download.nvidia.com (See Nvidia provides the direct package)
Directory on Server: /opensuse/11.2
Accept the Server Key (because you trust the server)
From the YAST Menu, Select Software Management search for the Nvidia Driver and install it.
The kicker is that OpenSUSE software updates is IRRITATINGLY SLOW.
So bear with it.

After installing and rebooting it will be automatically activated.


  • Restricted Formats
Due to licensing issues OpenSUSE doesn't have restricted format support out of box but they are downloadable here (Unfortunately the libraries broke the cheese webcam functionality).

Edit: To prevent breaking of the cheese webcam functionality do the following:

Add VLC to the software repository(Use VLC to play all your future videos)
Then use Fluedo Codec for Banshee
After this the webcam functionality will be preserved.

You might also want to do the following configuration of the conf files below.

Edit: /etc/sudoers
Append "DISPLAY" as shown below
Defaults env_keep = "LANG LC_ADDRESS LC_CTYPE LC_COLLATE LC_IDENTIFICATION LC_MEASUREMENT LC_MESSAGES LC_MONETARY LC_NAME LC_NUMERIC LC_PAPER LC_TELEPHONE LC_TIME LC_ALL LANGUAGE LINGUAS XDG_SESSION_COOKIE DISPLAY"

The reason so you can sudo something in GNOME Desktop Mode.

Edit /etc/fstab
Add noatime to the line of your main disk partition so it will not write last modified date to your Harddisk (Less unnnessary harddisk operations)

Add this line to /etc/fstab to make /tmp folder a RAMDisk so /tmp will be automatically cleared during shutdown.
tmp              /tmp            tmpfs    defaults,size=512m,noatime,nodiratime    0 0
The size allocated is 512MB.

Open YAST select bootloader
Rename the Windows 7 Entry to something you like.
Rename the OpenSUSE Entry to something you like. 
Set the default OS to something you use more often.
Add acpi_osi=Linux to the end of the OpenSUSE boot parameters (If you used my Modded BIOS with Linux in the ACPI)

Overall I like OpenSUSE a lot.
The fonts and themes are much better than Ubuntu.
The laptop is running cooler than Ubuntu for some reason I don't know.
WebCam runs as well with the default cheese application.
Adobe Flash runs well.
Batterylife is good as well (the same as Windows 7) previously on Ubuntu it had shorter batterylife.

Other Cool Features:
SYSTEM, YAST,Kernel Settings
You can adjust the CPU scheduling algo as shown below.


If you installed it on the same harddisk as your Windows OS, the Windows OS is accessible in the following folder
/windows/


For best Font Display use the following Settings in Appearance:
Select Detail


Select Slight Hinting instead of Full
In conclusion this is an awesome OS on Aspire 4530, you should try it!

Thứ Ba, 17 tháng 8, 2010

Free Harddisk Cloning Solution

I am sure there are times you need to move all harddisk content over to another disk without the luxury of the time to reinstall.

Here is the free Home-Based solution just by using a <1GB Thumbdrive you can image your harddisk without buying software like Norton Ghost or Acronis.

Originally the software requires unetbootin to create a bootable thumbdrive but they have updated the tool to be able to self-create a bootable thumbdrive.

Download EASEUS Disk Copy from EASEUS.Unzip dc.zip to a location.

Then run to create the boot thumbdrive


After that plug in your source and destination harddisk, boot from thumbdrive then run disk copy and do a sector by sector imaging!

Thứ Hai, 16 tháng 8, 2010

New Stuff I discovered regarding temperature control

Recently I updated all my drivers again but soon I realized that my laptop was running hotter than usual.
I mean really hot like 60 degrees on Idle.
I soon narrowed it down to the latest chipset driver I install so I reverted to the old driver and surprisingly it went down.
I took a look using HWMonitor and found that the latest chipset driver was working the processor really hard consuming 25watts constantly on idle.
I downgraded the chipset driver to the previous version and the problem disappeared immediately.
So the story of this lesson is do not assume anything and anything newer shiny != greater.

So if you encounter heat issues you might also wish to try revert to old version.
Also for Windows 7 compatible machines setting the processor cooling management to passive means the fan will spin less (quieter) but it will operate at generally higher temperatures. In contrast setting it to passive mode means it will spin more (noisier) but keep temperatures lower.

Chủ Nhật, 8 tháng 8, 2010

The 100MB Partition in Windows 7

As you might already know Windows 7 default installation creates a 100MB partition during Setup.
The function is not really documented on the Internet, however reading this you should already know what it is for.


The partition in question is the System Reserved Partition.

So lets compare the Windows 7 installation with and without the 100MB System Reserve Partition.

Firstly lets take a look at the root drive of the Windows 7 with the 100MB:


Next lets take a look at the root drive of the Windows 7 without the 100MB:


So what is the the difference? It is the presence of file and folder required for booting like bootmgr etc...

Open up the 100MB partition and what do you know we are right!


So what does this means?
It means in actual fact the extra partition is optional has 0 effects on system operation.

So lets take a logical approach and think of possible reasons for this change.

1)Prevent Noobs from accidentally killing their Windows Installation by moving the boot files off C:\ to a partition they can't touch? Possible Very Likely
2)Optimize boot performance by moving boot files to the first partition(front part of the drive)? Possible as well.
3)Modularize the OS file layout? Very possible a much more elegant solution than cramping all the files into C:\.In fact it could mean you could multiboot multiple Windows OS on volumes without having repeated Boot files in each and every installation.

What does this means to end user? It means for those Dual Booters like me it is 4 - 2 primary partition left instead of 4 - 1.
Does it matter? No because you can create logical/extended partition to bypass the 4 primary partition limit in legacy Master Boot Record (MBR).
It doesn't affect GUID Partition Tables (GPT) on EFI systems.
Unfortunately Windows 7 doesn't do GPT volume installation.

So remember the 100MB is just a rearrangement of boot files. Period.