The story goes:
You heard that Vista is slow and lousy so you have decided to "downgrade" to Windows Xp
So you happily install Xp and delete the original system partition and install a new Xp partition
However you smartly left the recovery partition intact.
A few week later you suddenly felt like trying out Vista
However to your horror you couldn't
You tried the famous Alt-F10 to activate Acer Disk to Disk Recovery (D2D) but it doesn't work although the recovery partition is fully intact
You wonder why?
The reason is the original boot record has been overwritten by the Windows Xp you installed over the special original Acer/Vista one so there is no way the boot record will activate recovery.
So I will show you how to activate the Recovery Partition in a few simple steps:
Before you proceed make sure you backup all your important data first
Step 1:
Download PTEDIT32 from here
PTEDIT is a special disk utility to re-mark partition to another type so it becomes bootable
(It should work on all Windows OS)
Step 2:
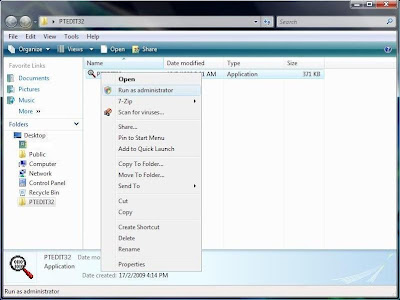
Extract it to a folder and Right Click run it with Administrator Permission otherwise it will not run (Xp users ignore the right click)
Step 3:
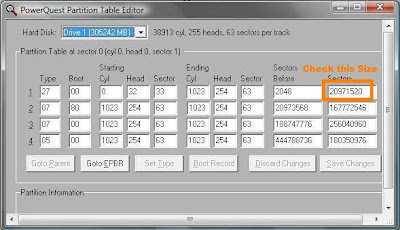
Look at the first entry that is your hidden partition PROVIDED YOU DID NOT ACCIDENTALLY DELETE IT if you did, I recommend you look here instead.
To double confirm check the size make sure it is small like the screenshot
Step 4:
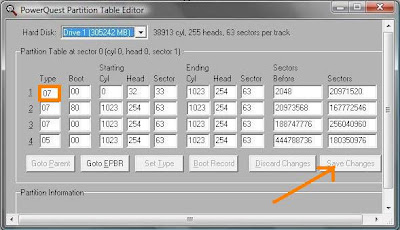
Change the partition type to 07 from 27 (If the partition type is of another value, change to the same type as your system disk C:\)
Then make the changes.Reboot to take effect.
Step 5:
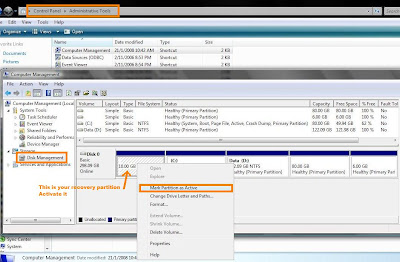
Open Control Panel>> Administrative Tools>> Computer Management>> Disk Management
Step 6:
Mark the partition as Active
Then Reboot disk recovery will start automatically
Please remember to burn a copy of the factory default image and driver disk as a backup after that using Empowering Backup, if you haven't already done so.
So you happily install Xp and delete the original system partition and install a new Xp partition
However you smartly left the recovery partition intact.
A few week later you suddenly felt like trying out Vista
However to your horror you couldn't
You tried the famous Alt-F10 to activate Acer Disk to Disk Recovery (D2D) but it doesn't work although the recovery partition is fully intact
You wonder why?
The reason is the original boot record has been overwritten by the Windows Xp you installed over the special original Acer/Vista one so there is no way the boot record will activate recovery.
So I will show you how to activate the Recovery Partition in a few simple steps:
Before you proceed make sure you backup all your important data first
Step 1:
Download PTEDIT32 from here
PTEDIT is a special disk utility to re-mark partition to another type so it becomes bootable
(It should work on all Windows OS)
Step 2:
Extract it to a folder and Right Click run it with Administrator Permission otherwise it will not run (Xp users ignore the right click)

Step 3:
Look at the first entry that is your hidden partition PROVIDED YOU DID NOT ACCIDENTALLY DELETE IT if you did, I recommend you look here instead.
To double confirm check the size make sure it is small like the screenshot

Step 4:
Change the partition type to 07 from 27 (If the partition type is of another value, change to the same type as your system disk C:\)
Then make the changes.Reboot to take effect.

Step 5:
Open Control Panel>> Administrative Tools>> Computer Management>> Disk Management
Step 6:
Mark the partition as Active
Then Reboot disk recovery will start automatically

Please remember to burn a copy of the factory default image and driver disk as a backup after that using Empowering Backup, if you haven't already done so.
Alternatively you can do this
Using a command line
- Open Command Prompt. (Right Click "Run As Administrator" For Vista)
- Type:
- diskpart
- At the DISKPART prompt, type:
- list disk
- At the DISKPART prompt, type:
- select disk n (In this case it is disk 0)
- At the DISKPART prompt, type:
- list partition
- At the DISKPART prompt, type:
- select partition n (Where n is a number. In this case it is partition 1)
- set id=27 override
- At the DISKPART prompt, type:
- active
- Reboot your computer
New:
If you can't even boot into Windows, simply use another working computer download gpart iso image.
Burn to CD as an disk image you need special burning tools like Nero or Roxio.
Then boot from CD you burn by entering BIOS (F2 or Delete usually) select CD-DRIVE as the first boot device save and exit.
If you want to recover your data, plug in an external harddisk and start saving your information.
Then you should see something like this if you try to manage partition in gpart.
 Assuming the first partition is your recovery partition, simply right click on it, select manage flags on the recovery partition.
Select it as "boot" then restart.

Không có nhận xét nào:
Đăng nhận xét