Thứ Sáu, 28 tháng 6, 2013

Subway Surfers Paris Modded (Unlimited Coins and Keys)

***Instructions***


JUST INSTALL THE APK AND PLAY


DASH as fast as you can!
DODGE the oncoming trains!
Help Jake, Tricky & Fresh escape from the grumpy Inspector and his dog.
★ Grind trains with your cool crew!
★ Colorful and vivid HD graphics!
★ Hoverboard Surfing!
★ Paint powered jetpack!
★ Lightning fast swipe acrobatics!
★ Challenge and help your friends!
Join the most daring chase!
A Universal App with HD optimized graphics.

Thứ Năm, 27 tháng 6, 2013

Change BIOS Splash On Lenovo Government Laptop.

Before starting up with the tutorial you need to download three files which is available here : Download

Step 1 : Backup Your Current BIOS Screen.

  • Extract The Downloaded File Named "Universal BIOS Backup ToolKit 2.0"
  • Right Click On The EXE file and Run it as Administrator. 
  • Now Click Read Button
  • Once the read process is complete click on the Backup button and save that file in a safe place. This is the Backup of the original BIOS. 
  • Backup Process Is Complete

Step 2 : Customize The BIOS.

  • Make a copy of your bios file that we made in the previous step and name it "44CN43WW.fd".
  • Now extract the "Ezh20.zip" File to get the BIOS editor.
  • Run EZH20.exe as Administrator. 
  • In the EZH20 window, select File -> Load file and select the renamed "44CN43WW.fd" file
  • Now the editor will show you the file's properties. Click Ok.
  • Now go to Components -> Logo and You'll see something like shown below.

  • You should click the "Image Information" drop-down and select the JPG(1024*768) option.
  • Now in the "Logo Image To Load" section, click "Browse" and select the image file you need to use. (Scroll down for a few splash screen images I made in the correct format or go to the next section to know how to make your own image as using incorrect format will damage your BIOS.)
  • Now click on "Patch" and wait (do not click or move anything at all) till it completes. It should say "FD file modify finished" on the bottom left.
  • Now select the option File -> Save and wait till it says "FD file save data finished" on the bottom left.
  • Now you can close the window. You have finished replacing the splash screen.

Creating Our Custom BIOS Screen

  • Open Photoshop and select the File -> New option with the below settings exactly.

  • Create whatever artwork you like, taking note that the right bottom corner will get cut off a little so don't put anything much in the right bottom.
  • Do not make your artwork too complex and avoid gradients or using too many colors. The flatter the colors the better. This is because the image file size must not be too high. If it becomes too high, there won't be enough space on the EEPROM chip where the BIOS is saved and it might corrupt your BIOS making it unable to boot. So just keep your artwork as minimal as possible.
  • Now you must resize your image to 1024x768 px (to avoid stretched look, we work on 1366x768 px and resize to 1024x768 so that even though the output after this step will look stretched, when booting it will look normal.)
  • To resize, go to Image -> Image size and in the dialog box, untick "Constrain proportions" checkbox (Important) and in width box enter 1024 and leave the height box at 768.
  • Choose the option File -> Save As and select any name for your image file and select the format as "BMP" from the drop-down menu.
  • On the next dialog box, choose 16 Bit as color depth and Windows mode as shown below.


  • Now use this saved image to load to the customized BIOS Splash
  • Or Use Any Of This I Designed, Download here : Images

Step 4 : Flashing a customized BIOS file

  • Right click the file "1DCN26WW.exe" That You've downloaded. Using 7Zip, extract the contents of the file. 
  • In the extracted folder delete the 1DCN26WW.fd file.
  • Copy the customized BIOS file "44CN43WW.fd" into this folder.

  • Now make sure your laptop is charged more than 30% AND ALSO connected to a charging port via the AC adapter. Otherwise the Flashing utility will NOT start. Also make sure not even one window is open as it will cause problems when the laptop tries to automatically restart.
  • Run the InsydeFlash.exe File as administrator.
  • Click OK to flash your BIOS. Do not touch your track-pad, mouse or keyboard until the laptop completes the automatic restart.


Thứ Tư, 26 tháng 6, 2013

Thứ Năm, 13 tháng 6, 2013

GET BACK YOUR RECYCLE BIN


Recycle Bin is used to keep unnecessary files or folder. Some of my blog visitors asked about this problem that how they can get back their recycle bin after deleting it on windows XP.
You can use this method to get back recycle bin. 
Important Note.
For this purpose you will have to modify the Registry. It is strongly recommended that if you have some basic knowledge of registry then you can try it. Otherwise some serious problems might occur if you modify the Registry incorrectly. Now let’s try it. Follow these steps carefully to edit the registry to make the Recycle Bin icon reappear on your desktop.

i.  Click START and then click RUN
ii.  Now type “ regedit” and then click OK.
iii. Locate the following registry key
HKEY_LOCAL_MACHINE\SOFTWARE\Microsfot\windows\Current
version\Explorer\Desktop\namespace 
iv. Right click the registry key that you located in number(iii), Point to new and then click key.
v.  Now Type {645FF040-5081-101B-9F08-00AA002F954E} and press Enter.
vi.  After this click the new {645FF040-5081-101B-9F08-00AA002F954E} key.
vii. In the right, use your mouse to double click the default entry.
viii.   You will see a “Edit string dialog box”. Type Recycle Bin in the value data box and finally click OK.
ix.   Now close your registry Editor and check your desktop.
x.    You will see recycle Bin icon on your desktop wall. 


Thứ Tư, 22 tháng 5, 2013

OpenWRT Release Tagged


For users on fibre you can set port priority using swconfig
swconfig dev rtl8366rb port 1 set priority 1
To check 
 swconfig dev rtl8366rb port 1 get priority
To get it to run persistently on boot
echo 'swconfig dev rtl8366rb port 1 set priority 1' >> rc.local
This will only work on patched rtl8366rb drivers.
For unpatch openwrt firmware you have to use vconfig.

Updated to R37083

Attitude Adjustment with full ipv6 support including LuCI.
Downgrade the dhcpmasq to a non ipv6 version as the function is already added into the default Attitude Adjustment.
Review all the LuCI options and fix them, expose more wifi options.
This release is really a good one!.

For WR1043ND
"-Os  -pipe -march=24kc -mno-mips16 -mgp32 -fno-caller-saves -mno-branch-likely -mplt -msym32"

I also patched lighttpd to use
server.network-backend = "linux-sendfile"
server.event-handler = "linux-sysepoll"

This is done by patching the Makefile to enable linux-sendfile function which I do not know why it was disabled in OpenWRT's lighttpd Makefile.
I did it by #undef sendfile_broken and #define have_send_file

I managed to add the repo to github
OpenWRT  TL-WDR4300
OpenWRT TL-WR1043ND

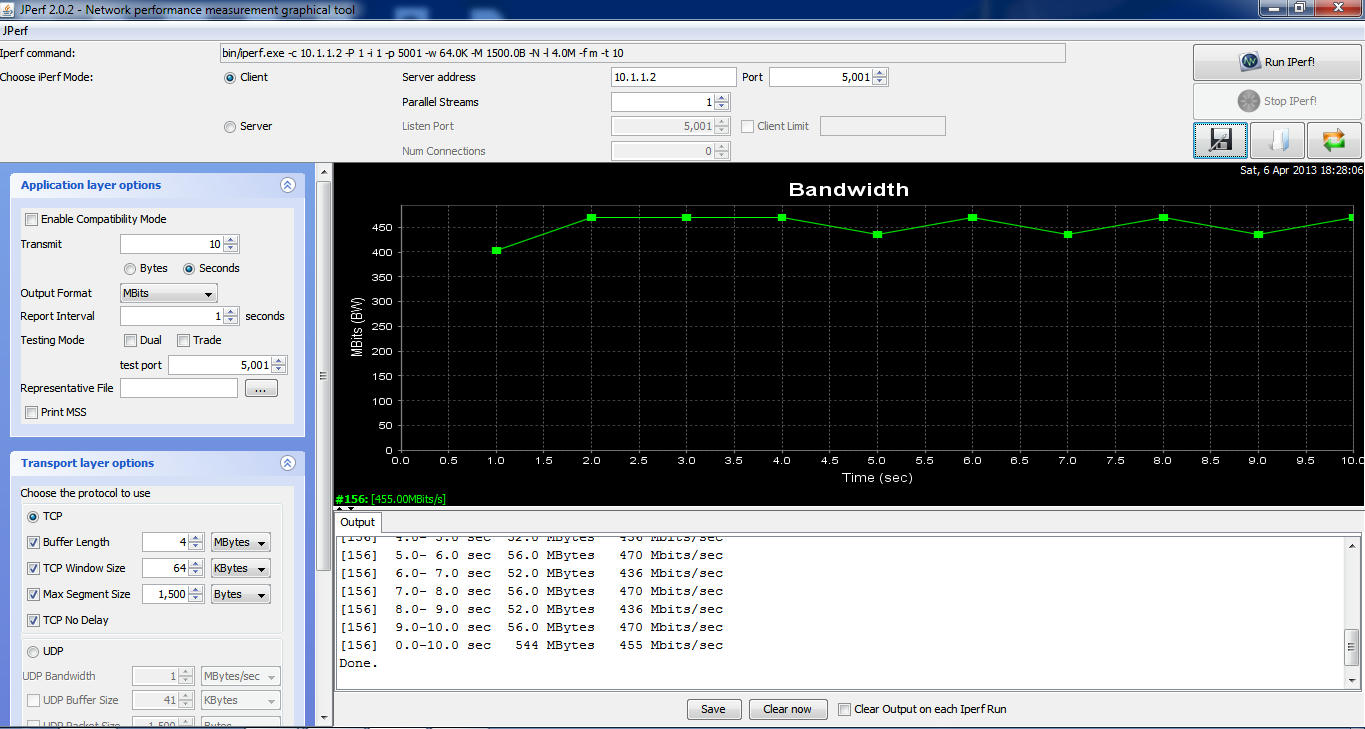
For my jperf (iperf +java frontend) I recorded increase in NAT speeds for both Routers but I would like those with highspeed internet to give me feedbacks.

Reminder: setting Wireless Region to 'US ' unlocks all "Wireless Goodness"

You can check updates on OpenWRT side using their development site.

Cheers!

Update:

Updates refreshed.
Removed Atheros Options since they are actually not support from documentation.
Integrate Jumbo Switch and Storm Filter since there are no issues.

Attitude Adjustment is Tagged and released!

I have also released a Beta version with Jumbo Frames and Storm Filtering
ssh into the router and use

swconfig dev rtl8366rb show (to display switch setting)

swconfig dev rtl8366rb set max_length 3

swconfig dev rtl8366rb set apply (apply the settings)

The rest you can figure out on your own using help option.

Note that the Jumbo Frame is a switch only option reason is that the AR9132 SoC DOES NOT SUPPORT JUMBO FRAME only the switch RTL8366RB do.

I have just release another update, changes are as follows:
-Rename some of the stuff in LuCI
-Removal of excess packages(torrents etc) now 1.8 MB left for you to install the stuff you want
  1. There is a lot of feedback from people who want to install specific packages for their own needs so the best way is to give them space to do that.
-Compress Javascript and CSS
-Update certain packages
-Rename PnP and uShare modules device information
-Remove pure-ftpd and added vsftpd with TLS
(managed to compile successfully and tested it)
  1. vsftpd with TLS does encrypted FTP using less flash and less RAM 
Added Port Monitoring Patches to the switch driver of both Routers

OpenWRT Attitude Adjustment Release For TL-WDR4300
LAN to WAN Wired Benchmark Software Routing


OpenWRT Attitude Adjustment Release for TL-WR1043ND
LAN to WAN Wired Benchmark Software Routing

With L7-Protocol and QoS (Default Configuration)


With L7-Protocol and QoS Service Stopped MSS disabled


Wireless LAN to WAN (2M Line of Sight)
With L7-Protocol and QoS Service Stopped MSS disabled
Using AES WPA2-PSK encryption 40MHZ Fat Channel, noscan enabled dtim_period=1
Basically what you can expect on Wireless.
Note: Results may vary due to interference of surrounding networks

    As usual
    Factory for upgrading from TP-LINK stock firmware to OpenWRT firmware
    Sysupgrade for upgrading from older OpenWRT version to newer OpenWRT version

    Thứ Ba, 21 tháng 5, 2013

    Installing Jellybean in Sony Live With Walkman ( WT19i) in Easy Steps.

    Step 1 : Unlock the bootloader, using the Sony's Tutorial
    Step 2 : Download The Flash Tool Here : http://androxyde.github.io/
    Step 3 : Download the Rooted Extended Stock Kernel. Link, Download CM10 for coconut and GAPPS  and copy it to the SDCARD.
    Step 4 : Connect the phone via flashmode ( Turn off and press Volume Down button while connecting to PC )
    Step 5 : Place the downloaded kernel to Firmware folder of the flashtool say (C:\Flashtool\firmwares)
    Step 6 : As soon as phone is detected in the flashtool as "Device is connected in flashmode") Flash the kernel by clicking on the flash button.
    Step 7 : Disconnect the phone and get into the recovery mode buy pressing the volume down button rapidly after seeing the Sony logo.
    Step 8: Select the option "Install Zip From sdcard" , in the recovery mode. then get into "Chose Zip From sdcard", Finally select the CM10 zip file and flash followed by the GAPPS file.
    Step 9. The reboot the system.. now you'll be in Cyanogenmod.

    Thứ Bảy, 13 tháng 4, 2013

    Download Subway Surfers and Temple Run For Armv6 Processor

    Subway Surfers


    Features:
    ★ Grind trains with your cool crew! 
    ★ Colorful and vivid HD graphics! 
    ★ Hoverboard Surfing! 
    ★ Paint powered jetpack! 
    ★ Lightning fast swipe acrobatics! 
    ★ Challenge and help your friends!

    Links
    Download Subway Surfers 


    Temple Run

    Hit IOS Game is finally now arrived on Android,so many peoples were eagerly waiting for this game for android and it is now arrived on android,and converted to armv6 for armv6 Android phones,I think i do not need to give intro about this game because its so famous,so finally waiting is over,i will just say download install and RUN...

    Links
    Download Temple Run