Thứ Năm, 29 tháng 11, 2012

Control Your Android Phone From Your Computer


Hello friends, hope you are all fine. Nowadays most of us use android phone and me too so I searched through online to control my mobile from my computer, in that way I found one way. You can ask me is it possible and even simple? The Answer is YES! You can by an simple application which is free in the market called “Airdroid”.

Why I choose this?
 There are many free applications in android market to control and connect your android phone with PC without cable. But the main problem is they uses more memory from your phone so it causes mobile hanging and slows down our phone software processing speed. In this way “AIRDROID” uses very less memory to process this so there is nothing affected by this application.

http://www.2012-tricks.blogspot.com


Steps to follow:
Step 1: Download and Install “AirDroid” application on your Android Device from android market, its fully free application.


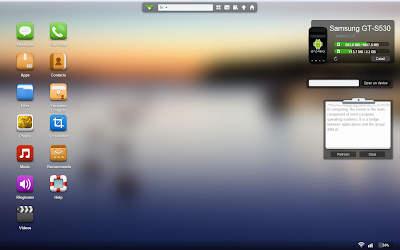
Step 2 : After installing Airdroid on your device simply Run it and you will see the screen like the above page. In this you can see the URL(ip address)  and password field.
Step 3: Now you are successfully installed your apps, and ready to connect with you computer. For this you need a web browser.
Step 4: Then open your browser and enter the URL(ip address with port) you see in your Airdroid Device App in your web browsers field like below and hit enter.


Step 5: After you hit enter the new Airdroid will page and prompt you to enter PASSWORD, So you have you enter your password which you seen in your Airdoid Device application. Then click Login.
Step 6 : Now you are ready to Control you android device from your PC. Just control everything. ….

See you in the next post.  Thanks for watching this friends…..


Thứ Tư, 28 tháng 11, 2012

Create Windows XP USB Install (Step by step)

Create Windows XP USB Install (Step by step)

Required:
1. USB drive 1GB-4GB.
2. Windows XP installation disk.
3. USB Prep app. (XP_FROM_USB)

This process allows you make a USB flash disk/drive bootable and exactly the same as the XP installation CD. To make the whole process you should have a PC/Computer/Laptop with CD/DVD Rom. Once you make your USB drive ready to boot windows  XP setup from it then you can start Installing Windows XP from that USB Disk/drive in any computer.

Update: You should have XP installed computer for this process.

The procedure

1. Extract the XP_FROM_USB.rar archive in a folder named Softslas(Say) in C: drive. Now navigate to C:>SoftslasPeToUSB and double-click on the peToUSB.exe.
install-windows-xp-from-usb-drive-part-2-2
The appearing window will be like this:
install-windows-xp-from-usb-drive-part-2-3
Set the following values:

  • select “USB Removable as Destination Drive”.
  • select “Enable Disk Format”.
  • select “Quick Format”.
  • select “Enable LBA (FAT 16x)”.
Finally, put  XP-Softslas (or whatever you want) as Drive Label and click Start.
A message appears and click Yes.

Another message box will again appear and click Yes.

Immediate after that the USB disk will be formatted. Wait for few seconds and then click on “Ok” and “Close”.
3. Open the windows Command prompt by typing cmd at the Run box. The cmd.exe console appears.
Now type the following syntax and hit the Enter button from your keyboard.
cd c:softslasbootsect
Again, type the following command and press “Enter”.
bootsect /nt52 I:

Type “cd..” and press “Enter” and also type cd usb_prep8 and press Enter.

Now type usb_prep8 and press “Enter”.
install-windows-xp-from-usb-drive-9
4. Press any key to continue.
Now the command prompt window will look like this.
install-windows-xp-from-usb-drive-10
Prepares Windows XP LocalSource for Copy to USB-Drive:
0) Change Type of USB-Drive, currently [USB-stick]
1) Change XP Setup Source Path, currently []
2) Change Virtual TempDrive, currently [T:]
3) Change Target USB-Drive Letter, currently []
4) Make New Tempimage with XP LocalSource and Copy to USB-Drive
5) Use Existing Tempimage with XP LocalSource and Copy to USB-Drive
F) Change Log File – Simple OR Extended, currently [Simple]
Q) Quit
Enter your choice:_
Insert the XP installation CD in you CD/DVD ROM and in command prompt window, type 1 and press “Enter”. A “Browse For Folder” window will appear and here select the CD/DVD drive and then click OK.
Similarly, for the choice field enter 2 and if there assigned the letter “T” for your computer then change it otherwise do not alter it. After typing 2 in the choice option it will prompt “Enter Available Virtual Drive Letter”.
Here, type a letter that is not any drive letter of your computer.
Let us say S is not a drive letter in your computer. So put S then press “Enter”.
Now it will get back to the Command prompt and then type 3 where it prompts for the choice. Then it will prompt “Please give Target USB-Drive Letter e.g type U”.

install-windows-xp-from-usb-drive-11
Now, put your USB drive letter and press “Enter”. Here, my USB drive label is “I” so I put “I”.
Again,  input 4 and press Enter. It creates the new temporary image  and makes a copy of it to the USB Flash Drive.
Please wait for a few seconds..
A warning message will appear like this:
“WARNING, ALL DATA ON NON-REMOVABLE DISK DRIVE T: WILL BE LOST! Proceed with Format (Y/N)?”
Type Y and press “Enter”.
Please wait………..
After completing Format it will prompt “Press any key to continue” and to continue  hit any key .
Please wait………..
It will again prompt “Press any key to continue” and obviously press any key to continue.
5. Now a message box will appear showing
“Copy TempDrive Files to USB-Drive in about 15 minutes = Yes OR STOP = End Program = No”
install-windows-xp-from-usb-drive-12
Click “Yes”.
Now after this a message box will appear showing “Would you like USB stick to be preferred Boot Drive U……………….”
Click “Yes”.
The next one asking “Would you like to unmount the Virtual Drive ?”
install-windows-xp-from-usb-drive-13
Click “Yes”.
Now wait some time and press any key…………….
Press any key again to close usb_prep8.
Now your USB you can Install Windows XP from the USB drive.
6. Insert your USB drive in the USB port and Reboot your computer. When starts the computer enter in the BIOS Setup and set the first boot preference as USB Hard Disk.Now Save and Exit from the BIOS Setup. Your computer will again restart and the following screen will appear.
install-windows-xp-from-usb-drive-14
Now Chose The TXT Mode Setup.After completing the partition, formatting and copying file the computer will restart again.
Now chose the GUI Mode Setup Option.
install-windows-xp-from-usb-drive-16
Wait for completing your installation.
I think this will help you to install XP from USB flash disk/drive especially in those computer without CD/DVD-ROM.


Source:
Techtipsgeek.com

Good Luck!