Thứ Hai, 3 tháng 12, 2012

Do you want to Find & Download Mp3 & video simply?

Hello friends, today I am going to show how you can find your exact MP3 and Video Easily in search engines. I know you are all downloaded many mp3 and video from search engines but before that you are triggered to go through many sites and pages to download a single mp3. So now I am going to show you find your needed music file in through search engines like Google, Yahoo, Bing..


Step 1 : Open Google search engine first.

 Step 2: Now let’s assume I am going to download the song “Machi Open the bottle” from “Mangatha”.

Step 3:  just copy the code below with double quotes and paste it in your google search box.

"parent directory" mp3 OR wma OR ogg OR wav Machi Open the bottle -html -htm -shtml -phtml -php -buy -aspx -jsp -asp -cgi -pdf -ftp –wallywashis

Step 4: Now you can see the magic..

So Just you can replace the song name Machi open the bottlewith your needed song name. Below this I given the query for  video download.

"parent directory" avi OR mpg OR mpeg OR asf OR wmv "Machi open the bottle" -html -htm -shtml -phtml -php -buy -aspx -jsp -asp -cgi -pdf –ftp


Here are the queries for other search engines:

MP3 SEARCH – BING AND YAHOO

"parent directory" AND (Machi Open the bottel) AND (mp3 OR wma OR ogg) -html -htm -shtml -phtml -php -buy -aspx -jsp -asp -cgi -pdf –ftp


VIDEO  -  BING AND YAHOO

"parent directory" AND (MAchi open the bottle) AND (avi OR mpg OR mpeg OR asf OR wmv) -html -htm -shtml -phtml -php -buy -aspx -jsp -asp -cgi -pdf -ftp

(NOTE : All the queries are included with double quotes so copy the query with double quotes)

VIDEO OF THIS POST


Thứ Năm, 29 tháng 11, 2012

Control Your Android Phone From Your Computer


Hello friends, hope you are all fine. Nowadays most of us use android phone and me too so I searched through online to control my mobile from my computer, in that way I found one way. You can ask me is it possible and even simple? The Answer is YES! You can by an simple application which is free in the market called “Airdroid”.

Why I choose this?
 There are many free applications in android market to control and connect your android phone with PC without cable. But the main problem is they uses more memory from your phone so it causes mobile hanging and slows down our phone software processing speed. In this way “AIRDROID” uses very less memory to process this so there is nothing affected by this application.

http://www.2012-tricks.blogspot.com


Steps to follow:
Step 1: Download and Install “AirDroid” application on your Android Device from android market, its fully free application.


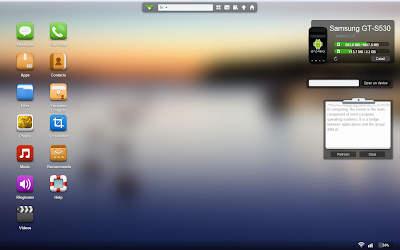
Step 2 : After installing Airdroid on your device simply Run it and you will see the screen like the above page. In this you can see the URL(ip address)  and password field.
Step 3: Now you are successfully installed your apps, and ready to connect with you computer. For this you need a web browser.
Step 4: Then open your browser and enter the URL(ip address with port) you see in your Airdroid Device App in your web browsers field like below and hit enter.


Step 5: After you hit enter the new Airdroid will page and prompt you to enter PASSWORD, So you have you enter your password which you seen in your Airdoid Device application. Then click Login.
Step 6 : Now you are ready to Control you android device from your PC. Just control everything. ….

See you in the next post.  Thanks for watching this friends…..


Thứ Tư, 28 tháng 11, 2012

Create Windows XP USB Install (Step by step)

Create Windows XP USB Install (Step by step)

Required:
1. USB drive 1GB-4GB.
2. Windows XP installation disk.
3. USB Prep app. (XP_FROM_USB)

This process allows you make a USB flash disk/drive bootable and exactly the same as the XP installation CD. To make the whole process you should have a PC/Computer/Laptop with CD/DVD Rom. Once you make your USB drive ready to boot windows  XP setup from it then you can start Installing Windows XP from that USB Disk/drive in any computer.

Update: You should have XP installed computer for this process.

The procedure

1. Extract the XP_FROM_USB.rar archive in a folder named Softslas(Say) in C: drive. Now navigate to C:>SoftslasPeToUSB and double-click on the peToUSB.exe.
install-windows-xp-from-usb-drive-part-2-2
The appearing window will be like this:
install-windows-xp-from-usb-drive-part-2-3
Set the following values:

  • select “USB Removable as Destination Drive”.
  • select “Enable Disk Format”.
  • select “Quick Format”.
  • select “Enable LBA (FAT 16x)”.
Finally, put  XP-Softslas (or whatever you want) as Drive Label and click Start.
A message appears and click Yes.

Another message box will again appear and click Yes.

Immediate after that the USB disk will be formatted. Wait for few seconds and then click on “Ok” and “Close”.
3. Open the windows Command prompt by typing cmd at the Run box. The cmd.exe console appears.
Now type the following syntax and hit the Enter button from your keyboard.
cd c:softslasbootsect
Again, type the following command and press “Enter”.
bootsect /nt52 I:

Type “cd..” and press “Enter” and also type cd usb_prep8 and press Enter.

Now type usb_prep8 and press “Enter”.
install-windows-xp-from-usb-drive-9
4. Press any key to continue.
Now the command prompt window will look like this.
install-windows-xp-from-usb-drive-10
Prepares Windows XP LocalSource for Copy to USB-Drive:
0) Change Type of USB-Drive, currently [USB-stick]
1) Change XP Setup Source Path, currently []
2) Change Virtual TempDrive, currently [T:]
3) Change Target USB-Drive Letter, currently []
4) Make New Tempimage with XP LocalSource and Copy to USB-Drive
5) Use Existing Tempimage with XP LocalSource and Copy to USB-Drive
F) Change Log File – Simple OR Extended, currently [Simple]
Q) Quit
Enter your choice:_
Insert the XP installation CD in you CD/DVD ROM and in command prompt window, type 1 and press “Enter”. A “Browse For Folder” window will appear and here select the CD/DVD drive and then click OK.
Similarly, for the choice field enter 2 and if there assigned the letter “T” for your computer then change it otherwise do not alter it. After typing 2 in the choice option it will prompt “Enter Available Virtual Drive Letter”.
Here, type a letter that is not any drive letter of your computer.
Let us say S is not a drive letter in your computer. So put S then press “Enter”.
Now it will get back to the Command prompt and then type 3 where it prompts for the choice. Then it will prompt “Please give Target USB-Drive Letter e.g type U”.

install-windows-xp-from-usb-drive-11
Now, put your USB drive letter and press “Enter”. Here, my USB drive label is “I” so I put “I”.
Again,  input 4 and press Enter. It creates the new temporary image  and makes a copy of it to the USB Flash Drive.
Please wait for a few seconds..
A warning message will appear like this:
“WARNING, ALL DATA ON NON-REMOVABLE DISK DRIVE T: WILL BE LOST! Proceed with Format (Y/N)?”
Type Y and press “Enter”.
Please wait………..
After completing Format it will prompt “Press any key to continue” and to continue  hit any key .
Please wait………..
It will again prompt “Press any key to continue” and obviously press any key to continue.
5. Now a message box will appear showing
“Copy TempDrive Files to USB-Drive in about 15 minutes = Yes OR STOP = End Program = No”
install-windows-xp-from-usb-drive-12
Click “Yes”.
Now after this a message box will appear showing “Would you like USB stick to be preferred Boot Drive U……………….”
Click “Yes”.
The next one asking “Would you like to unmount the Virtual Drive ?”
install-windows-xp-from-usb-drive-13
Click “Yes”.
Now wait some time and press any key…………….
Press any key again to close usb_prep8.
Now your USB you can Install Windows XP from the USB drive.
6. Insert your USB drive in the USB port and Reboot your computer. When starts the computer enter in the BIOS Setup and set the first boot preference as USB Hard Disk.Now Save and Exit from the BIOS Setup. Your computer will again restart and the following screen will appear.
install-windows-xp-from-usb-drive-14
Now Chose The TXT Mode Setup.After completing the partition, formatting and copying file the computer will restart again.
Now chose the GUI Mode Setup Option.
install-windows-xp-from-usb-drive-16
Wait for completing your installation.
I think this will help you to install XP from USB flash disk/drive especially in those computer without CD/DVD-ROM.


Source:
Techtipsgeek.com

Good Luck!

Thứ Bảy, 22 tháng 9, 2012

OpenWRT updates

It has been a while since I have written anything, but if you notice I have been updating the OpenWRT Attitude Adjustment Builds on TP-Link WR1043ND.

I have removed a lot of excess packages since so you can actually install the stuff you want. You can do extroot if there is still not enough.

Upgrading the firmware is actually a piece of cake, I do it in 5 minutes.
1) Make sure the backup utility in openwrt backs up the configuration you want.
2) Create archive using the backup utility
3) Flash and clear settings
4) Log in to router update time and disable unwanted startups
5) Upload the backup archive. Done!

Cheers.

Thứ Sáu, 14 tháng 9, 2012

How to Hide Your Private Folder


To learn carnatic music online visit : ilearncarnaticmusic.com
 

Hello Friends, this is a simple trick to hide some folder for your private files, but this is not the step by any batch programming. Just follow the steps:

Step 1 : Create a folder in any drive on your computer and copy your private files to that folder.

Step 2 : Right click that folder and select “Rename” then hold “Alt” key and type “0160” (don’t release alt key till the four letter typed “ALT + 0160”) .

Its only working on num keyboar guys please note this

how to hide folder


Step 3: Then right click the folder and select “Properties” from that dialog box go to customize tab.

Step 4: Now click “Change Icon” and select the empty icon in the list(that is available in 13th column of the list).


Now check that folder is in hide state. Please look at this video for clear instruction.

Thứ Năm, 30 tháng 8, 2012

How to auto login in Window 7


Hello friends, today the post is to automatically login in to your computer without asking the user login page. That means you can have more than one user in your computer but you usually use only one account daily means you can set that account as auto login so that you need not to login every time you switch on your computer. Here are the steps:

Step 1: Login into your account and then click “Start” menu and then type “Netplwiz” and press Enter.

Step 2: A User account box will appear, which shows the user names of your computer. 


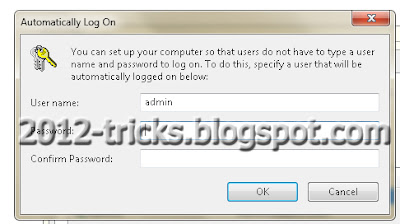
Step 3: Then click the name of the username which is to auto login. And then uncheck the box above the ser name “Users must enter a username and password to use this computer” then press “OK”.

Step 4: Then it will ask you username and password. After enter username and password click “Ok”.

Computer tips and tricks - Gunaseelan SEO


Step 5: To check restart your computer, it will not ask you the login credentials.


See this video to see the steps visually


Author Bio: I am Gunaseelan – SEO Analyst in Chennai. I am doing SEO in last 2 years for some niche sites and get ranking well. Nowadays our team getting a stepping stone ORM projects. See my facebook profile here: http://www.facebook.com/gunaseelanbaabin

Thứ Tư, 1 tháng 8, 2012

How to Use Pendrive as Key for PC

Hello Friends, this is the post to show how to use pendrive as a login key for your PC. This is more secure because you dont want to remember your password. Just insert your pendrive and you can login to your PC. You cant start your PC without that pendrive. I show your the trick in this video Please watch it and enjoy. Thank You.

Thứ Ba, 31 tháng 7, 2012

How to hide a drive on from my computer

Hello friends, today we are going to discuss about hiding a drive from computer.

Why we have to do this?

In our home all our friends and family members can use our computer. So its not a safe environment for your personal files. So we have to hide that from them. After doing this trick the specified partition is hidden from my computer and nobody knows there is one another partition there. So you can use that partition for your own personal only.

How to do this?

Step 1: Open run prompt ( windows key + R)

Step 2: Type gpedit.mscand hit enter, a group policy window will appear.

Step 3: From that window just open the following path:

User Configuration ==> Administrative Templates ==>  Windows Components ==>  Windows Explorer

refer the image

hide a drive on from my computer - Gunaseelan


  (select windows explorer root folder and see the list in the right site)

Step 4: From that list double click “Hide these specified drives in My Computerand then you will get a new window.

Step 5: In that window select the enable option at top and then select the drive which you have to hide from others. And then click apply and then ok.

hide a drive on from my computer - Gunaseelan


Now go to My Computer and check that the selected drive is hidden.

Again to view that drive do the same steps and at last select disable in the above picture.


(NOTE: If the drive still not hidden means just restart your computer and check that will be hide)