Change BIOS Splash On Lenovo Government Laptop.
Before starting up with the tutorial you need to download three files which is available here : Download
Step 1 : Backup Your Current BIOS Screen.
- Extract The Downloaded File Named "Universal BIOS Backup ToolKit 2.0"
- Right Click On The EXE file and Run it as Administrator.
- Now Click Read Button
- Once the read process is complete click on the Backup button and save that file in a safe place. This is the Backup of the original BIOS.
- Backup Process Is Complete
Step 2 : Customize The BIOS.
- Make a copy of your bios file that we made in the previous step and name it "44CN43WW.fd".
- Now extract the "Ezh20.zip" File to get the BIOS editor.
- Run EZH20.exe as Administrator.
- In the EZH20 window, select File -> Load file and select the renamed "44CN43WW.fd" file
- Now the editor will show you the file's properties. Click Ok.
- Now go to Components -> Logo and You'll see something like shown below.
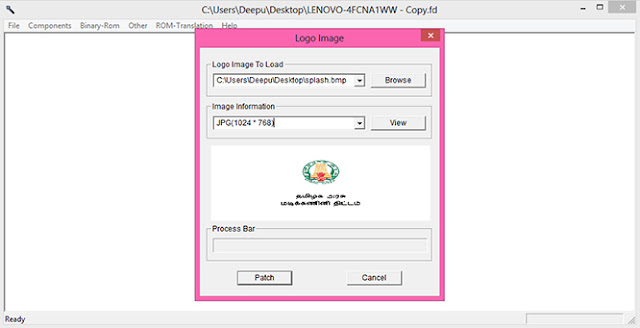
- You should click the "Image Information" drop-down and select the JPG(1024*768) option.
- Now in the "Logo Image To Load" section, click "Browse" and select the image file you need to use. (Scroll down for a few splash screen images I made in the correct format or go to the next section to know how to make your own image as using incorrect format will damage your BIOS.)
- Now click on "Patch" and wait (do not click or move anything at all) till it completes. It should say "FD file modify finished" on the bottom left.
- Now select the option File -> Save and wait till it says "FD file save data finished" on the bottom left.
- Now you can close the window. You have finished replacing the splash screen.
Creating Our Custom BIOS Screen
- Open Photoshop and select the File -> New option with the below settings exactly.
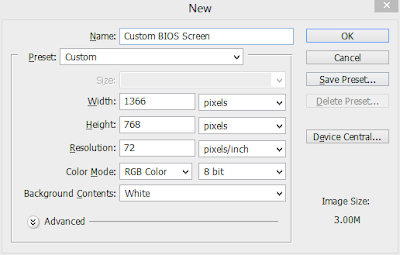
- Create whatever artwork you like, taking note that the right bottom corner will get cut off a little so don't put anything much in the right bottom.
- Do not make your artwork too complex and avoid gradients or using too many colors. The flatter the colors the better. This is because the image file size must not be too high. If it becomes too high, there won't be enough space on the EEPROM chip where the BIOS is saved and it might corrupt your BIOS making it unable to boot. So just keep your artwork as minimal as possible.
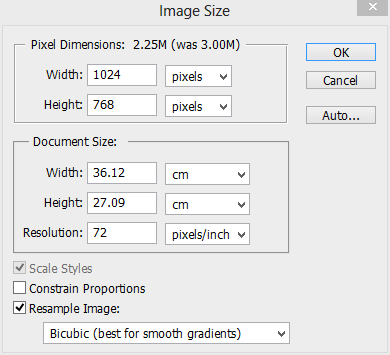
- Now you must resize your image to 1024x768 px (to avoid stretched look, we work on 1366x768 px and resize to 1024x768 so that even though the output after this step will look stretched, when booting it will look normal.)
- To resize, go to Image -> Image size and in the dialog box, untick "Constrain proportions" checkbox (Important) and in width box enter 1024 and leave the height box at 768.
- Choose the option File -> Save As and select any name for your image file and select the format as "BMP" from the drop-down menu.
- On the next dialog box, choose 16 Bit as color depth and Windows mode as shown below.
- Now use this saved image to load to the customized BIOS Splash
- Or Use Any Of This I Designed, Download here : Images
Step 4 : Flashing a customized BIOS file
- Right click the file "1DCN26WW.exe" That You've downloaded. Using 7Zip, extract the contents of the file.
- In the extracted folder delete the 1DCN26WW.fd file.
- Copy the customized BIOS file "44CN43WW.fd" into this folder.
- Now make sure your laptop is charged more than 30% AND ALSO connected to a charging port via the AC adapter. Otherwise the Flashing utility will NOT start. Also make sure not even one window is open as it will cause problems when the laptop tries to automatically restart.
- Run the InsydeFlash.exe File as administrator.
- Click OK to flash your BIOS. Do not touch your track-pad, mouse or keyboard until the laptop completes the automatic restart.


Không có nhận xét nào:
Đăng nhận xét